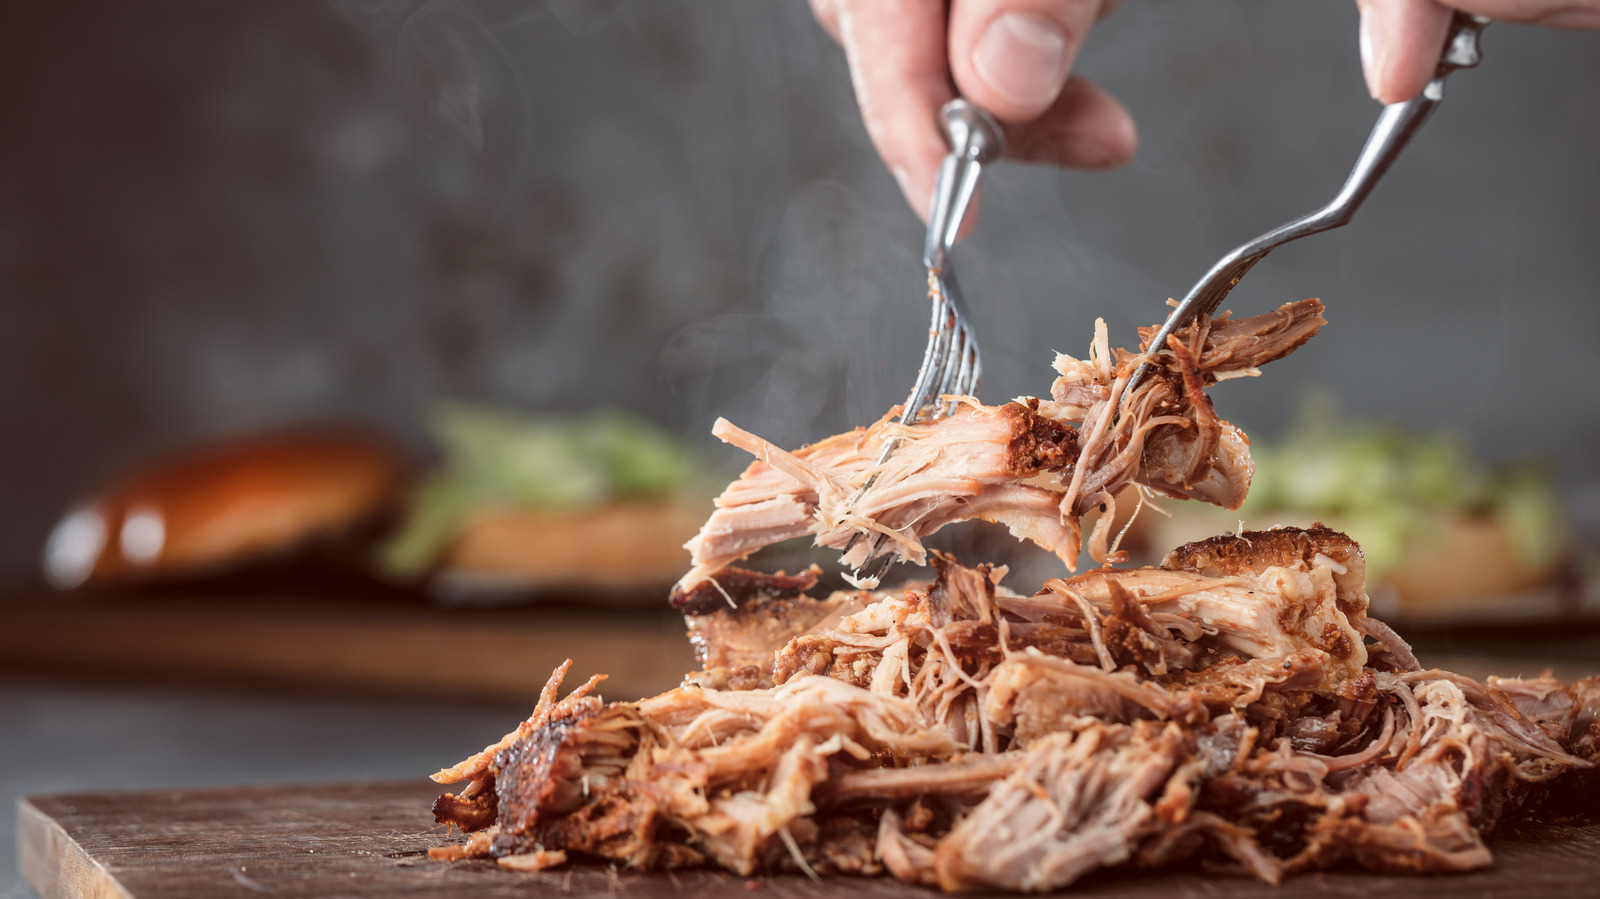
Fennel bulb substitute: Discover 8 versatile alternatives!
Fennel bulb substitute alternatives: anise, celery, parsley, onion, artichoke, bok choy, dill, leeks, Pernod Absinthe, cumin, licorice root, caraway seeds
Continue ReadingFennel bulb substitute alternatives: anise, celery, parsley, onion, artichoke, bok choy, dill, leeks, Pernod Absinthe, cumin, licorice root, caraway seeds
Continue ReadingRecipe for Homemade Pancakes without Milk:
– Flour
– Sugar
– Baking powder
– Salt
– Egg
– Water
– Butter
– Vanilla extract
Optional additional flavorings:
– Chocolate chips
– Berries
– Bananas
– Nuts
– Cinnamon chips
Alternative milk substitutes:
– Almond milk
– Soy milk
– Oat milk
– Coconut milk
– Cashew milk
– Pistachio milk
– Hemp milk
– Rice milk
Instructions:
1. Whisk dry ingredients (flour, sugar, baking powder, salt) together in a bowl.
2. In a separate bowl, whisk wet ingredients (egg, water, melted butter/vegetable oil, vanilla extract) together.
3. Combine wet and dry ingredients, mix until just combined.
4. Cook batter on a nonstick skillet over medium heat.
5. Flip pancakes when slight bubbles appear in the batter, cook for an additional 2-3 minutes.
6. Serve immediately or store leftovers in an airtight container in the fridge for up to 4 days or freeze for up to 3 months.
7. Reheat in the microwave or in a 325F oven.
Nutrition Information per serving:
– Calories: 354
– Carbohydrates: 43 g
– Protein: 6 g
– Fat: 17 g
– Saturated fat: 4 g
– Polyunsaturated fat: 4 g
– Monounsaturated fat: 8 g
– Trans fat: 0.01 g
– Cholesterol: 41 mg
– Sodium: 967 mg
– Potassium: 77 mg
– Fiber: 1 g
– Sugar: 6 g
– Vitamin A: 736 IU
– Vitamin C: 0.04 mg
– Calcium: 286 mg
– Iron: 3 mg
– Chili can last for three to four days when stored properly in the refrigerator.
– It is important to store chili within two hours after cooking or purchasing it from a restaurant.
– Proper storage includes transferring chili into an airtight container, storing it in the coldest part of the fridge, and labeling and dating it.
– Chili should be checked for signs of spoilage before reheating and eating, and it should be reheated to an internal temperature of 165°F before serving.
– After four days, it is recommended to discard any remaining chili.
– The primary factors that affect how long chili can last in the fridge are how it was cooked, how it’s stored, and the age of the ingredients used.
– If chili is not brought to a boil, it should be discarded after two days as harmful bacteria may have developed.
– Expired ingredients used to make chili should be discarded immediately as they may contain harmful bacteria.
– Chili can go bad if it is not stored correctly, cooked at a high temperature, or checked for expiration before use.
– Signs of spoiled chili include mold, color change, sour smell, and off smell.
– Eating expired chili could cause food poisoning, with symptoms including nausea, vomiting, abdominal cramps, and diarrhea.
– Chili can be frozen for longer storage by transferring it into an airtight freezer-safe container and reheating it to an internal temperature of 165°F prior to serving.
– Frozen chili can last up to six months in the freezer.
– Meat-based chili can be enjoyed up to four days after cooking, while chili without meat may stay fresh for up to five or six days.
– Chili should be cooled down before refrigeration.
– Canned chili can be eaten up to one week later.
– Leftover chili should be stored in shallow containers with a depth of no more than two to three inches.
– Chili is a type of stew or sauce that typically includes beans, tomatoes, and meat.
– The ingredients of chili are cooked together in a pot or slow cooker.
– Spices such as cumin, oregano, garlic powder, onion powder, and chili powder can be added to enhance flavor.
– Chili should be stored in an airtight container in the refrigerator within two hours after cooking or purchasing.
– It is important to store chili in the coldest part of the refrigerator, usually at the back near the bottom shelf.
– Chili should be labeled and dated before storing.
– Before reheating and eating chili, check for signs of spoilage such as discoloration, an off-putting smell, or a slimy texture.
– Reheat chili to an internal temperature of 165°F before serving.
List of pertinent substitutes for bulgur:
1. Quinoa
2. Whole-wheat couscous
3. Cracked wheat
4. Durum wheat
5. Almond meal
6. Wheat berries
7. Kamut
8. Farro
9. Barley
10. Orzo
11. Rice (white or brown)
12. Bamboo rice
13. Buckwheat groats
14. Millet grains
15. Amaranth
16. Teff
17. Shelled hemp seeds
18. Rolled oats
19. Steel-cut oats
– Rambutan is a fruit with a ball of white flesh in the middle and a pit/seed.
– It is typically eaten fresh but can also be added to fruit salads, curries, and desserts.
– The taste of rambutan is subjective but is described as very sweet with a hint of sourness.
– It has a note of floral tropical taste and the texture is a mix between a grape and a pear, or maybe a cherry.
– The skin has a woody taste when it falls off the seed.
– Rambutan tastes similar to lychee as they are in the same family of fruits.
– The fruit is considered yummy and worth trying.
– The price of rambutan may vary depending on location, but 20 to 25 of them can be bought for around $3.00.
– USDA mandates that pre-ground meat must be cooked to an internal temperature of 160°F for food safety
– Ground poultry must be cooked to 165°F to be considered safe
– Bacteria is on the surface of steaks and whole pieces of meat, so searing at high temperatures kills surface bacteria and makes the inside safe to eat at medium-rare temperatures
– Grinding up steak distributes bacteria throughout the ground meat, so it must be cooked to 160°F in the middle to ensure all bacteria is killed
– Use a reliable meat instant read thermometer for accurate temperature control
– Ground beef is more susceptible to contamination compared to whole cuts
– Multiple cows can be processed into pre-ground beef, contaminating the entire batch if even 1% is tainted
– USDA guidelines for cooking temperatures are seen as stringent by some chefs. Restaurants and chefs must follow guidelines from the USDA and local health departments to ensure public safety and prevent foodborne illnesses.
– Grind your own beef to have more control over the safety of the meat. Follow guidelines such as keeping ground beef cold, using separate prep areas for raw meat and produce, washing hands, and sanitizing kitchen surfaces. Grinding your own meat offers benefits such as freshness, quality, and customizable blends.
– There are several advantages to grinding your own meat for burgers, including control over the ingredients used and the ability to experiment with different flavors.
– Grinding at home can also be cost-effective compared to buying pre-ground meat.
– According to USDA standards, ground beef should be cooked to a minimum temperature of 160°F to ensure safety. However, if grinding at home, different temperature ranges can be used to achieve different levels of doneness, such as well done (160°F to 165°F), medium well (150°F to 155°F), medium (140°F to 145°F), medium rare (130°F to 135°F), and rare (120°F to 125°F).
– A two-stage cooking method is recommended for cooking hamburgers on the grill. The method involves using a lower-heat side to cook the burgers slowly, and then moving them to a higher-heat side to sear in the juices. This method allows for better control over temperature and doneness.
– Conclusion: The article discusses the importance of cooking ground meat to the appropriate temperature for safety, the risks of contamination in pre-ground meat, the benefits of grinding your own meat, and guidelines for achieving different levels of doneness when cooking burgers.
List (without duplication):
– Instructions on how to dry sage
– Rinsing and patting the leaves dry
– Binding the leaves together
– Hanging the leaves up to dry
– Putting the leaves in a paper bag
– Sage drying for later use in cooking
Outdoor pizza ovens
Purchasing considerations for outdoor pizza ovens
Portable and affordable countertop models
Evaluating the location for the oven
Investing in a stand or table
Different fuel sources for outdoor ovens
Propane as the most common fuel option
Wood, wood pellets, and charcoal as alternative fuel options
Gas-powered ovens for ease of use and faster heating
Size and power considerations for outdoor pizza ovens
Minimum and maximum temperature requirements
Choosing oven size based on serving capacity
Considering the weight and portability of the oven
Recommendations for propane pizza ovens
Based on customer reviews, ratings, and research
Testing approach for different fuel options
Factors examined during testing, including construction and stone size
Assembly, space, and portability considerations
Temperature performance and heating time evaluation
Consistent cooking and crust crispiness
Actual temperature vs. manufacturer claims
Ease of use and design considerations
Cleaning features such as removable pizza stones and ashtrays
Versatility of the ovens for cooking other food items
Cooling down time of the ovens
Finding a pizza oven to suit different needs, budgets, and outdoor spaces
Encouragement to purchase expert-approved picks.
– Sourdough bread is recommended for making french toast because it has a sturdier texture that doesn’t become soggy while soaking.
– The recipe requires pantry ingredients like milk, egg, vanilla, cinnamon, and salt.
– The suggested soaking time for 3/4 inch slices of regular sourdough bread is 2 minutes per side, but for heartier bread like whole wheat sourdough, it may require a longer soak.
– The batter in the recipe has a milkier consistency to give the french toast a creamier texture.
– The recipe recommends using bread that is 3-5 days old.
– The french toast should be cooked over medium heat to ensure the inside cooks through and the outside browns without burning.
– Ground coriander
– Caraway seeds
– Chili powder
– Taco seasoning
– Curry powder
– Garam masala
– Paprika
– Fennel seeds