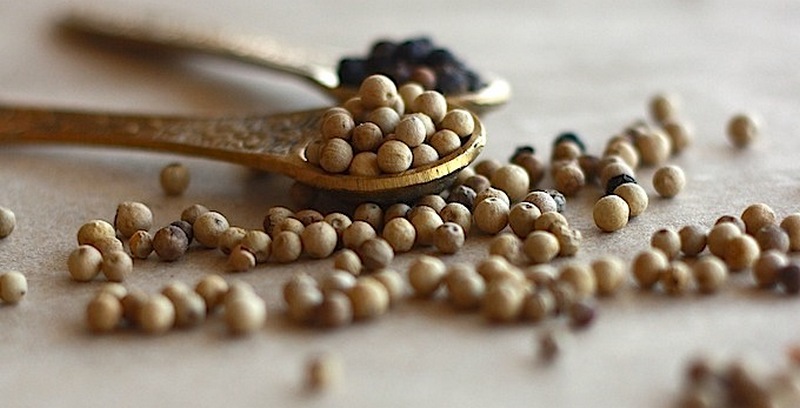
Deliciously Crispy: Reheat Egg Rolls in Air Fryer

– Egg rolls can become soggy when reheated due to excess moisture seeping into the filling and exterior.
– Microwaving egg rolls can result in soggy texture, but wrapping them in a paper towel or using a microwave-safe slotted stand can help maintain some crunchiness.
– Using an oven or toaster oven is a better option for reheating egg rolls if you want a crispy exterior.
– Preheat the oven to 350 F and line a baking sheet with aluminum foil that has been sprayed with cooking spray.
– Lay the egg rolls on the sheet without touching each other.
– Bake the egg rolls for about five minutes, flipping them halfway through for even crispiness.
– For the air fryer method, set the air fryer to 350 F, place the egg rolls in the basket and cook for one to two minutes, flipping them halfway through the process and cooking for an additional two minutes.
– For the stove top method, heat a frying pan with oil, and cook the egg rolls until crispy, but note that this method requires more oil.
– It is recommended to defrost frozen egg rolls before using any method to reheat them.
– To reheat egg rolls in a frying pan, use olive oil, canola oil, or cooking spray on medium heat. Cook for 5-10 minutes, flipping to ensure even crispiness.
– To reheat egg rolls in a deep fryer, unfreeze frozen egg rolls in the fridge and then deep-fry for 30-45 seconds or 9-10 minutes for frozen, uncooked egg rolls.
– It is not recommended to put additional oil on egg rolls as it can make them greasy and soggy.
– To store egg rolls, overcooked ones can be stored in the fridge for 4 hours, while hot egg rolls should cool down before being stored in the freezer.
– Vegetable spring rolls can be reheated using similar methods but require lower heat and less cooking time due to their delicate wraps.

Continue Reading

Ninja Blender Dishwasher Safe: The Ultimate Guide to Efficient Cleaning and Maintenance

– All Ninja products and parts are dishwasher safe except for the motor.
– The container, cups, lids, and blades are all dishwasher safe.
– It is recommended to remove the blade from the cup or pitcher and place the lids and blades in the top rack of the dishwasher.
– Hand washing is also an option, where the container should be broken down into individual parts and washed in warm, soapy water.
– After handwashing, rinse off the parts and let them air dry before reassembling the blender components.
– You can use your Ninja blender to self-clean by adding warm water and a few drops of dish soap, running it on high for 30 seconds, rinsing, and drying.
– Self-cleaning may not work well for removing peanut butter from the blender.
– While Ninja blenders are dishwasher safe, hand washing them may prolong their lifespan.
– Most Ninja blenders have dishwasher-safe parts, but cleaning instructions may vary between models.
– The pitchers, blending cups, lids, blades, blade assemblies, and gaskets of Ninja blenders are dishwasher safe, but the motor base is not.
– It is generally recommended to place these parts on the top rack of the dishwasher.
– Dishwasher safe Ninja blenders include the BL610 Series, BL660Q Series, NJ600 Series, Ninja NJ601AMZ Professional Blender, Ninja Foodi Power Blender Ultimate System, Ninja Professional Plus Kitchen System, Ninja TWISTi, and Ninja Nutri-Blender Pro, among others.
– Ninja blenders are mostly dishwasher safe.
– They have a heating element incorporated in the base of the pitcher, making it safe to put in the dishwasher.
– Ninja blenders are powerful enough to self-clean, just fill the container with soapy water and blend on high.
– Some models have a pre-set cleaning setting for optimal cleaning.
– Hand washing is also an effective method.
– Steps to clean a Ninja blender: rinse after use, fill with warm water and dish soap, blend on high for 30-60 seconds, hand wash or put in the dishwasher if further cleaning is needed.
– When hand washing, use a non-abrasive sponge or cloth, rinse, and let dry before reassembling.
– When using the dishwasher, check for specific instructions (top rack, gentle cycle, non-abrasive detergent).
– The blender base should not be put in the dishwasher.
– Keeping the blades out of the dishwasher can help preserve them.

Continue Reading

Unleash the Flavor: Mastering the Art of Pie Server Techniques

List of features and benefits of a pie server:
1. Made from steel, plastic, or wood
2. Designed for serving individual pieces of pie, quiche, tart, or any wedge-shaped food item
3. Common design includes a flat, triangular-shaped serving surface with an attached handle
4. Some pie servers have a pointed serving end and a serrated edge for cutting through crusts and firmer foods
5. Can be referred to as a serving spatula or pie spatula
6. Essential tool for easily and cleanly serving desserts and other wedge-shaped dishes
7. Helps maintain the shape and presentation of the sliced food
8. Durable construction ensures long-lasting use
9. Easy to clean and maintain
10. Suitable for both casual and formal dining occasions

Continue Reading

Pancake Griddle Temperature Guide: Unlock Perfect Fluffiness and Flavors

– A pancake breakfast is suggested as a romantic gesture on Valentine’s Day.
– A griddle is recommended as the ideal equipment for making pancakes.
– A natural gas range is recommended for the griddle for precision cooking.
– A griddle is also useful for cooking meats and fried rice.
– Moderately priced stovetop griddles are available in various sizes.
– Cast iron griddles are recommended for even heat distribution and preventing sticking.
– Lodge Reversible Grill/Griddle is suggested as a durable and well-made cast iron griddle option.
– Correctly prepared batter is crucial for perfect pancakes.
– Over mixing batter results in tough pancakes.
– It is recommended to mix dry and wet ingredients separately before combining them.
– Letting the batter set for 15 minutes before cooking makes fluffier pancakes.
– Fruit, chocolate chips, and other add-ins should be added after the batter is dropped on the griddle.
– Separating egg yolks from whites and beating the whites until stiff peaks form can make fluffier pancakes.
– The ideal griddle temperature for pancakes is 375°F or medium setting for gas stovetop burners.
– Overheated griddles burn the pancakes on the outside and undercook them on the inside. The article discusses how to achieve the correct temperature for cooking pancakes on a griddle. It suggests preheating the griddle and testing the temperature by dropping water on the surface. If the water sizzles without dissolving, the temperature is correct. If it dissolves immediately, the temperature should be lowered. Once batter is poured on the griddle, it is best to flip each pancake only once and avoid pressing down on it with a spatula, as this can result in a tough texture. The article also mentions various pancake recipes, including Red Velvet Pancakes with Cream Cheese Topping, Whole Wheat Cherry Pancakes, Strawberry Sprinkle Funfetti Pancakes, and Peanut Butter Cup Pancakes.

Continue Reading

Splatter Guard: Why It’s Essential for Kitchen Safety

– Splatter guards are essential for reducing splattering and mess when cooking with hot oil in a wok or pan.
– There are splatter guards available in Australia to suit different pan diameters, with options for both domestic and commercial use.
– Splatter guards typically consist of flat metal mesh or perforated steel with a handle.
– They prevent mess and protect from hot oil and grease splatters.
– Splatter guards are useful for cooking messy foods that require a lot of cooking oil, such as fried chicken, fish fillets, and bacon.
– When buying a splatter guard, consider the size to ensure it fits securely without gaps, the material (metal or silicone), maintenance (ease of cleaning), and any additional features like foldable handles or heat resistance.
– There are different types of splatter guards available, including mesh screen splatter guards, foldable splatter guards, and silicone splatter guards.
– Mesh screen splatter guards are made of fine metal mesh and can be used for frying pans, pots, or woks.
– Foldable splatter guards have a hinged design for easy storage and can withstand high temperatures.
– Silicone splatter guards are heat-resistant shields that allow stirring or adding ingredients without removing the lid.
– Other types of splatter guards include oil splash screens for deep fryers and stovetop burner covers.
– Scanpan is a brand known for producing high-quality splatter guards.
– Le Creuset Splatter Guards are made of fine mesh with non-slip, heat-resistant silicone trim and are suitable for a wide range of cookware.
– Ecology Splatter Guards are made from recycled materials, making them eco-friendly and suitable for the environmentally conscious kitchen.
– Oxo Good Grips Splatter Guards have grooved rings and a handle that locks in place for convenience.
– Some additional accessories to consider when buying splatter guards are cookware lids, steamers, tongs, and oven mitts.
– Whether splatter guards are dishwasher-safe depends on the material, so it’s important to check the manufacturer’s instructions before washing.
– A splatter screen is typically made of mesh and used for cooking over flames or grills, while a splatter guard is designed specifically to prevent grease and food from spattering onto the stovetop.

Continue Reading

Wire cheese cutter: Innovations, history, and how to use

– The author mentions that wire cheese slicers are one of the most useful tools in their kitchen.
– They own three different wire-style cheese slicers with different designs.
– The wire slicers are used for tasks other than slicing cheese, such as portioning out soft dough and cubing cold butter or lard.
– The article discusses the various uses of wire cheese cutters, including cutting homemade confections, creating uniform thickness for crackers and cookies, and slicing softer items like cucumbers.
– The article provides information on purchasing spare wires for cheese slicers and mentions the availability of wires on Amazon.
– Customers are advised to measure their existing wires and compare them with the measurements provided on the site to ensure the correct replacement.
– Specific wire types and length requirements are mentioned for different types of cheese slicers, such as Prodyne slicers and Compact Marble Cheese Slicers.
– CheeseSlicing, LLC offers a lifetime replacement guarantee on wires for slicers they sell and provides information on how to request a replacement.
– The article describes the construction of a cheese slicer, mentioning that most slicers are made of marble or stainless steel and consist of a female nut, a stainless steel screw, and a wire ring.

Continue Reading

Under the Counter Can Opener: A Hidden Kitchen Gem for Effortless Meal Prep

The list of pertinent information extracted from the text related to the keyword “under the counter can opener” is as follows:

1. The article promotes a jar opener for weak hands tailored to seniors with arthritis.
2. The product’s current price is $27.86.
3. The opener is easy to grip and can be operated with one hand.
4. It is designed to remove tight jar lids and is considered an essential kitchen gadget for home assistance.
5. The opener is white in color.
6. The article contains only one sentence: “There seems to be a problem serving the request at this time.”

Note: There is no direct mention of an “under the counter can opener” in the provided text.

Continue Reading

Discover a Versatile Orange Zest Substitute for Baking

List of Substitutes for Orange Zest:

– Dried orange peel: 1 teaspoon of orange zest = ½ teaspoon of dried orange peel
– Candied orange zest: 2 tablespoons of candied orange zest = 1 teaspoon of orange zest
– Orange extract: 1 teaspoon of orange zest = ½ teaspoon of orange extract
– Orange juice: 1 teaspoon of orange zest = 2 tablespoons of orange juice
– Orange syrup: Cook equal amounts of freshly squeezed orange juice and sugar to create orange syrup
– Orange marmalade: Use orange marmalade as a substitute for orange zest in sweet recipes
– Orange essential oil: 1 teaspoon of orange zest = ¼ teaspoon of orange essential oil
– Lemon zest: Use in the same amount as orange zest
– Lime zest: Use in a 1:1 ratio as a substitute for orange zest
– Clementine zest: Use in the same amount as orange zest
– Grapefruit zest: Use in a 1:1 ratio as a substitute for orange zest
– Pomelo zest: Can be used as a substitute for orange zest
– Kumquat zest or peel: Can be used as a substitute for orange zest
– Yuzu zest: Can be used as a substitute for orange zest
– Vanilla bean: Can be used as a substitute for orange zest
– Apple cider vinegar: Can be used as a substitute for orange zest in savory dishes
– Omitting orange zest: If no substitutes are available, orange zest can be omitted from the recipe.

Continue Reading

Discover the Benefits and Uses of Air Fryer Paper Liner: A MustHave for Easy, OilFree Cooking!

– Types of air fryer liners available, such as parchment paper and silicone liners
– Convenience and benefits of using air fryer liners, including non-stick surface, easier cleaning, and protection of the fryer basket
– Differences between parchment paper liners and silicone liners, including convenience, fit, and material
– Tips for cleaning reusable liners, such as washing in warm, soapy water or using a dishwasher
– Use of aluminum foil or disposable aluminum foil liners in air fryers
– Benefits of using perforated liners for enhanced air flow and crispier food
– Importance of trimming and perforating liners for optimal cooking results
– Safety precautions when using liners, including using heat-resistant and food-safe materials, weighing down liners, and ensuring proper ventilation and airflow
– Common issues with air fryer paper liners, such as sticking and tearing, and solutions to prevent them
– Importance of properly fitting liners in the air fryer basket for efficient use
– Tips for cleaning and storing air fryer silicone mats or reusable liners promptly and properly
– The significance of using food-grade materials in the air fryer
– The importance of choosing the right size and shape of liners for the air fryer basket

Continue Reading