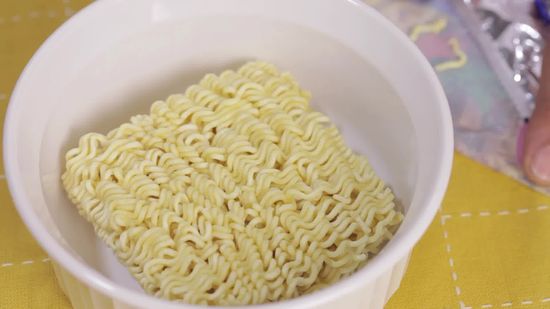
How to Clean Salmon: Tips and Techniques to Ensure Freshness and Flavor

– Cleaning salmon before cooking is important to remove surface contaminants and bacteria
– It eliminates impurities like sand and dirt
– It removes foul odor
– It ensures even cooking
– Tools needed: clean cutting board, sharp knife (optional for scaling and gutting), spoon (optional for gutting), paper towels
– Steps for cleaning salmon before cooking: rinse the salmon under cold running water, pat dry with paper towels
– Optional steps: remove scales using the backside of a knife or fish scaler, gut the salmon by making a shallow incision along the belly and removing the guts, rinse the cavity thoroughly
– Optional step: remove gills by gently pulling them out from the head-end of the fish
– Optional step: trim off fins and tail or cut the salmon into fillets or steaks
– Optional step: debone the fillets using fish tweezers or pliers
– When cutting salmon into steaks, remove the ribs by sliding a knife between the flesh and rib membrane
– After rinsing the salmon, wrap it tightly in plastic to minimize oxygen exposure
– Store salmon in the coldest part of the refrigerator (at least 32F) to keep it from spoiling
– Fresh salmon should keep for about two days in the fridge when properly wrapped
– Wash hands thoroughly with soap and water after handling raw fish
– Clean all surfaces and utensils that came into contact with the fish to avoid cross-contamination
– Cook salmon to the proper internal temperature of 145°F or 63°C
– Properly cleaning salmon ensures it is free of harmful bacteria, pathogens, and dirt
– Cleaning salmon makes for a visually appealing dish and prepares it to absorb desired flavors.

Continue Reading

The Ultimate Guide to Choosing the Perfect Tea Warmer: A Comprehensive Comparative Analysis

– Tea warmer
– Tea thermos
– Insulated bottles with filter infusers
– Mugs with infusers
– Tea accessories
– Temperature retention
– Stainless steel tea thermos
– Glass tea thermos
– Insulated tea bottles
– Airtight lids
– Quality insulation
– Tea temperature
– Traditional teapots
– Teapot substitute
– Tea on the go
– Portable teapots
– Perfect tea infusion
– Multiple tea filters
– Tea brewing
– Tea mug with infuser
– Tea thermos with infuser
– Personal habits
– Traveling tea brewing
– Fragile glass thermos
– Handmade borosilicate glass tea warmer
– Diameter: 5 in or 12.5 cm
– Compatible with Teaposy teapots
– Delicate glow of a flame
– Tea light
– Hand-blown glass base
– Metal heating plate
– Elegantly crafted
– Enhances Teaposy experience
– Blossoming Teaposy

Continue Reading

How to Freeze Kale: Preserve Nutrients for Longer

– Freezing kale without blanching may cause bitterness due to ripening enzymes in the leaves
– Unblanched kale can be used in stews and soups where bitterness can be overpowered
– Blanching kale leaves for 2.5 minutes and stems for 3 minutes is recommended for longer freezing time (8-12 months)
– After blanching, place leaves and stems in ice water for the same amount of time
– Dry blanched kale leaves by placing them on a towel, rolling it up, and squeezing out excess water
– Quick-freeze small clumps of kale individually on a cookie sheet before transferring to freezer bags
– Remove air from the bags before sealing
– Alternatively, place blanched and dried kale into individual packages prior to freezing
– Choose the right size freezer bag for serving-size portions and remove as much air as possible
– Frozen kale can be used in smoothies, sauteed with seasoned rice vinegar or garlic, added to quiches, stews, and soups, or used to make pesto.

Continue Reading

Sweet Savings: Candy Buffet Ideas on a Budget Your Guide to Affordable and Delicious Treats!

– The article provides tips for creating a candy buffet on a budget.
– Candy buffets can be expensive, with some costing over $1,000.
– The author shares their experience of creating a candy buffet for 40+ people for under $100.
– The first step is to determine the colors for the candy buffet.
– Buying candy in certain colors after relevant holidays can save money.
– The next step is to determine the amount of candy needed, with a rule of thumb of 8 oz. (1 cup) per guest.
– Bulk candy is recommended for cost savings, with 5 lb. bags being easy to calculate.
– Supplies needed for the candy buffet include candy in different varieties, sizes, and colors, as well as vases, bowls, and other containers.
– Suggestions for items needed include plastic scoops, tongs, buffet signs, and candy bags or boxes.
– The author recommends purchasing vases from the Dollar Tree or checking local thrift stores for containers.
– It is advised to borrow containers from family, friends, and neighbors to save on costs.
– Candy can be purchased from Amazon, Oriental Trading, or local stores like Winco.
– Other inexpensive options for packaging candy include favor boxes or clear cello bags with curling ribbon.
– The author shares a breakdown of their own candy buffet cost, which totaled under $100 for over 40 guests.
– Candy buffets are a popular option for events as they are customizable and versatile.
– Color scheme is an important decision for candy buffets, with options including monochromatic, black and white, rainbow, pastels, and saturated colors.
– Tips for candy buffets include being cautious of brightly colored candies that can melt and stain, using clear dishware to display the candy, and mixing candies of different shades for visual interest.
– It is recommended to purchase about eight ounces of candy per guest and to buy candy in bulk for cost-effectiveness.
– Types of candy commonly used in buffet include gummy candy, lollipops, “filler” candy (chocolate balls), taffy, candy-coated chocolate gems, rock candy, gumballs, twisted marshmallows, malt balls, and extras like cake and coconut snowballs.
– The article suggests adding a small cake to the display and keeping candy fresh by delaying shipment until right before the party and storing it in a cool location.
– It recommends using colorful bowls, cellophane bags, or Chinese-style takeout boxes for guests to put their candy in.
– The article mentions that there are no strict guidelines for how the candy buffet should look and that using jars, bowls, and trays of different sizes can create an appealing display.
– It suggests using a sturdy table and a tablecloth, preferably in a color that matches the candy.
– A backdrop in coordinating colors and pedestals to elevate containers are also recommended.
– The article suggests using a variety of containers such as mason jars, vases, bowls, trays, and cake stands to add visual interest.
– Symmetry can be maintained by using the same type of storage containers on either side of the buffet.
– This article provides some tips and ideas for creating a candy buffet on a budget.
– It suggests elevating one container of candy to create a point of interest and encourages mixing candy in different containers.
– Filler candy can be used at the bottom of larger containers to make it easier to reach other candy.
– Tall containers and containers with narrow mouths should be avoided to ensure easy access.
– Using glass containers is recommended for their aesthetic appeal, but breakable servingware may not be suitable if there are children or clumsy adults present.
– Hygiene is important, so it is best to set up the candy buffet in a way that minimizes guest contact.
– Tongs and candy scoops can be provided for guests to serve themselves and smaller serving implements are preferable to prevent excessive sugar consumption.
– Additional decorations such as confetti, ribbons, garlands, and plush animals can be added to the buffet table, but it is important to not overdo it.
– The article concludes by suggesting candy and chocolate gifts as a perfect centerpiece for a candy buffet.

Continue Reading

Churro Machine: Unveiling the Secrets to Perfectly Crispy Goodness!

– Commercial churro machine
– 2-basket fryer
– L-shaped working stand
– Fryer capacity: 6 L x 2
– Funnel capacity: up to 5 L of dough
– Five interchangeable nozzles for different thicknesses
– Made of 201 stainless steel
– Food-safe, durable, and easy to clean
– Designed for high productivity
– Can meet customer demand
– Churros served with sugar powder and melted chocolate
– Can be filled with caramel and white chocolate.

Continue Reading

Discover the Practicality and Safety of a Noodle Board for Gas Stove: Essential Tips and Tricks

List:

– Noodle board
– Wooden stove top cover
– Counter space
– Custom decor
– Holiday feast essentials
– Big serving tray
– Outdoor picnics
– Coffee delivery
– Solid wood
– Alder
– Oak
– Kitchen tidy
– Protecting stove top
– Dust protection
– Cleaner streak protection
– Style
– Compliments
– Ordering a noodle board
– Choosing the right one
– Matching noodle board to custom shelves
– Measuring stove for right size
– Monogram engraved on top
– Different color options
– Wood species
– Finish options
– Kansas City-based wood shop
– Personalized gifts
– High-quality wood
– High-quality finishes
– Website shopping
– Whiskey glasses in a wooden box
– Charcuterie boards
– Custom shelves

Continue Reading

How to Toast Bread Without a Toaster: Essential Kitchen Skills for Breakfast

-The article discusses alternative ways to toast bread without a toaster.
-The author suggests using a skillet on a stovetop to achieve the desired texture and browning of the bread.
-Toasting bread on a skillet is described as easy and convenient.
-The article mentions that toasters were invented in 1893 and were not necessary before then.
-The author argues that toasters are clunky, crumby, and take up space.
-The alternative method of toasting bread is seen as a way to save space in small kitchens.
-Toast can be quick and convenient but take up space and can be an eyesore.

Continue Reading

How to Eat Chicken Feet: A Guide to Traditional Cuisine

List of Pertinent Steps on How to Eat Chicken Feet:

1. Soak the chicken feet in hot water for 30 seconds to remove the skin and nails.
2. Combine the feet with salt, sugar, soy sauce, and garlic in a sauté pan.
3. Simmer the feet in the sauté pan for 2 hours.
4. Use chopsticks or hands for better grip while eating.
5. Bite off each joint before sucking the meat off the bone.
6. Gnaw at the chicken feet until only the bones remain.
7. Suck the skin and flavor from the toes.

Continue Reading