What are the nutritional benefits of barley

The Top 10 Uses For Barley, The Nutritional Benefits Of Barley, Recipes That Include Barley, How To Cook Barley, The History Of Barley, Where Does Barley Come From, Different Types Of Barley, How Barley Is Used In Brewing Beer, Fun Facts About Barley, And How To Incorporate More Barley Into Your Diet

Did you know that barley is one of the most versatile and nutritionally-dense ingredients out there? Here are the top 10 uses for barley, the nutritional benefits of barley, recipes that include barley, how to cook barley, the history of barley, where does barley come from, different types of barley, how barley is used in brewing beer, fun facts about barley, and how to incorporate more barley into your diet.

Continue Reading
How is glutney made

The Many Benefits And Uses Of Glutney

If you’re looking for a versatile ingredient that can add flavor and depth to your cooking, look no further than glutney! This humble pantry staple can be used in a variety of ways, from making savory sauces to adding a touch of sweetness to desserts. In addition to being delicious, glutney is also packed with health benefits. Here are just a few of the many reasons why you should start using glutney in your kitchen:

Continue Reading

Tantalizing Tuna Steak: Air Fryer Recipes to Savor

– Air Fryer Tuna Steaks are a quick and simple weeknight meal.
– Recipe uses fresh tuna and a ginger and soy sauce marinade.
– Recipe has almost zero prep time and fast cook time.
– Air fryer fish recipes make great dinners.
– Sweet and savory recipe is easy to prepare with ingredients on hand.
– Other air fryer fish recipes include Tilapia, Halibut, and Salmon.
– Optional ingredients include sesame seeds or chopped green onion.
– In a large sealable bag, combine ingredients to make marinade and coat tuna steaks.
– Let tuna marinate for about 30 minutes.
– Prepare air fryer basket by lightly spraying with olive oil spray or lined with parchment paper.
– Air fry steaks at 380 degrees F for 8-10 minutes, turning halfway through cooking time.
– Season with salt to taste and sprinkle with sesame seeds before plating.
– Tuna is a healthy source of protein, omega 3 fatty acids, and vitamins.
– Excess marinade cannot be used as a dipping sauce, but can be reserved before adding steaks.
– Optional to add rice wine, rice vinegar, or mirin to enhance flavor of marinade.
– Tuna steaks should only be eaten raw if labeled as sushi-grade tuna.
– Best to eat leftover tuna steaks fresh, but can be stored and reheated.

Continue Reading

The Best Way to Reheat Wings: A Comprehensive Guide

– This article provides a step-by-step guide on how to reheat wings to achieve delicious results.
– Chicken wings are considered white meat but have a concentrated poultry flavor of dark meat.
– Leftover wings can be challenging to reheat without over drying or making the skin rubbery.
– Proper food storage is important for the best texture and taste of reheated wings.
– Wings should be refrigerated in an airtight container as soon as they’ve cooled to room temperature and can be stored for 3-4 days or frozen for up to 3 months.
– The best methods for reheating wings are the oven, broiler, air fryer, and stovetop.
– The oven is highly recommended for reheating wings as it provides even heating and can achieve crispy skin and juicy interior.
– To reheat wings in the oven, preheat to 350 degrees Fahrenheit, place wings on a baking sheet with a wire rack, lightly brush with oil or cooking spray, spritz with water, and bake for 12 minutes until internal temperature reaches 165 degrees Fahrenheit and the exterior is crisp.
– Reheating in a standard oven range, countertop convection oven, or toaster oven with a convection or bake setting.
– Reheating under the broiler by setting it to high and positioning the rack 6-8 inches from the heating element. Flip the wings halfway through.
– Reheating in an air fryer by preheating it to 350 degrees Fahrenheit and placing the wings in a single layer in the basket. Lightly spritz or brush the wings with oil. Reheat for about 10 minutes, flipping halfway through until the meatiest portion of a wing reaches 165 degrees Fahrenheit.
– Reheating on the stovetop (only if previously fried). Fill a large, deep pan with ¼ inch of oil and heat it to 350 degrees Fahrenheit. Carefully transfer the wings to the oil and reheat for 3 minutes per side, flipping halfway through. Transfer to a plate lined with paper towels to drain excess oil.
– If the wings were sauced, toss them in reserved sauce after reheating.
– Two methods for reheating chicken wings to retain their crispy exterior and juicy interior.
– Method 1: Microwave and Oven Hybrid Method
– Preheat oven to 350 F.
– Line a microwave-safe plate with a damp paper towel.
– Place chicken wings on the plate and cover with another damp paper towel.
– Microwave wings for about 2 minutes or until slightly warm, being careful not to overheat.
– Transfer wings to a baking sheet and put them in the preheated oven.
– Cook for 1 minute, flip the wings, and cook for another minute.
– Check internal temperature of one wing, aiming for 165 F.
– Continue warming in the oven until internal temperature reaches target.
– Method 2: Frying Pan Method
– Let wings sit at room temperature for a few minutes after taking them out of the refrigerator.
– Heat 1-2 tablespoons of oil in a frying pan on high heat.
– Add chicken wings to the pan and fry for 2-3 minutes, turning halfway through.
– Once wings appear golden, check internal temperature of one wing, aiming for 165 F.
– Remove wings from the pan.

Continue Reading

Pizza Marinara: Uncovering the Origins and Authentic Recipe

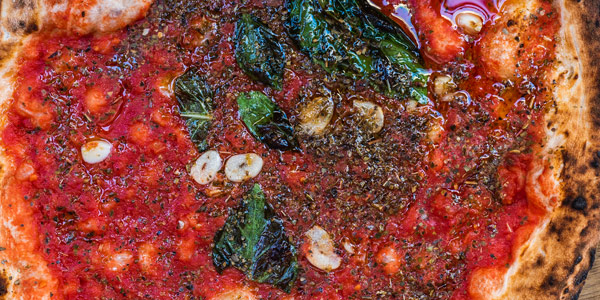
– Pizza marinara is a style of pizza in Neapolitan cuisine
– It is seasoned with only tomato sauce, extra virgin olive oil, oregano, and garlic
– It is supposedly the oldest tomato-topped pizza
– The recipe dates back to around the year 1735
– Historically, it was known to be commonly ordered by poor sailors and made on their ships due to it being made from easily preservable ingredients
– The recipe includes olive oil, cherry tomatoes, basil, oregano, and garlic
– The addition of tomatoes was considered an extra for both marinara and margherita pizzas
– The recipe can also include small fish, mozzarella slices, prosciutto, tomatoes, and wedge clams
– The process of making the pizza involves placing peeled tomatoes in the center of the pizza base, covering the entire surface with the sauce, slicing and scattering garlic, sprinkling oregano, and pouring extra virgin olive oil over the pizza
– In pizzerias in Rome, the recipe is commonly modified with additional ingredients
– Pizza marinara is a classic Neapolitan pizza that originated in Naples, Italy
– It does not have cheese and is topped with only tomato sauce, thinly sliced garlic, and oregano
– Pizza marinara and pizza Margherita are the most classic Neapolitan pizzas
– Pizza marinara is usually baked in a wood-fired oven at high temperatures
– Some sources state that pizza marinara originated as early as the mid-1700s in Naples
– The flavor of pizza marinara depends on the quality of the ingredients
– San Marzano tomatoes are preferred for Neapolitan pizzas, but fire roasted tomatoes can also be used for a sweeter flavor
– Canned fire roasted tomatoes are available at mainstream grocery stores and online
– The recipe for pizza marinara includes a quick and easy pizza sauce made with fire roasted tomatoes, garlic, olive oil, dried oregano, and salt
– The dough for pizza marinara is thin in the middle and poofed on the outside
– The article mentions that a pizza stone is needed to achieve the most authentic pizza marinara, as it helps to make the crust crispy on the bottom and soft on the inside
– A pizza peel is also recommended for transferring the pizza onto the pizza stone in the oven
– The article mentions that a pizza oven is not necessary but provides information on an inexpensive pizza oven
– The article ends by suggesting other pizza recipes

Continue Reading

Clementine vs Tangerine: Unraveling Their Origins, Nutritional Benefits, Varietal Differences

– Tangerines and clementines are both hybrids of the mandarin fruit.
– They have similar characteristics, such as small size, few to no seeds, sweet flavor, and easy-to-peel skin.
– Tangerines are native to Southeast Asia and are often called mandarins in the United States.
– Tangerines have a darker reddish-orange, soft, pebbly skin.
– Clementines are another variety of mandarin and are slightly smaller in size with a brighter orange color and smoother, shinier skin.
– Clementines are even easier to peel than tangerines.
– Both tangerines and clementines are more cold tolerant than larger orange varieties and are available from November through April.
– Tangerines and clementines have a very similar nutritional profile, providing carbs but minimal amounts of protein and fats. Both contain 40 calories, 1 gram of protein, less than 1 gram of fat, and 10 grams of carbs in an average-sized piece.
– Tangerines and clementines are both small fruits packed with vitamin C.
– Clementines have more vitamin C than tangerines, providing more than a full day’s worth of vitamin C when eating two.
– Both fruits contain carotenoid compounds, acting as vitamin A precursors and antioxidants.
– The major carotenoid in mandarin oranges (tangerines and clementines) is beta-cryptoxanthin.
– Eating the whole fruit provides more carotenoids than drinking the juice.
– Both fruits contain flavonoids such as naringin and hesperidin, which have anti-inflammatory and cardiovascular benefits.
– 65-70% of the fiber in both fruits is soluble, benefiting digestion and potentially lowering cholesterol levels.
– Eating either fruit can boost vitamin A levels and provide benefits for heart, digestion, and bone health.
– The article discusses the similarities and uses of clementines and tangerines. Both fruits are easy to eat as a snack and can be added to salads.
– The article suggests that the peels of both fruits can be used in cooking and to make tea.
– It also provides a recipe for making tangerine or clementine marmalade.
– The article notes that both fruits are perishable and should be consumed quickly, with refrigeration helping to extend their freshness.

Continue Reading

Does Kahlua need to be refrigerated? Discover expert advice!

– Kahlua, a coffee liqueur, should be consumed within 6-8 months after opening for best taste
– Kahlua has a shelf life of four years after opening
– Kahlua will expire if it has a sour smell, discoloration, sugar crystals, curdling, or mold growth
– Kahlua should have a strong coffee flavor with caramel and vanilla notes
– Once opened, Kahlua can be stored for up to 18 months before it starts to lose flavor
– Kahlua does not need to be refrigerated, but storing it in a cool, dry place is recommended
– Refrigerating Kahlua will not increase its shelf life
– Freezing Kahlua will alter its texture, flavor, and quality
– To extend the shelf life of Kahlua, keep it away from direct sunlight, store it in a cool, dark, and dry place, and tightly seal the bottle after opening

Continue Reading