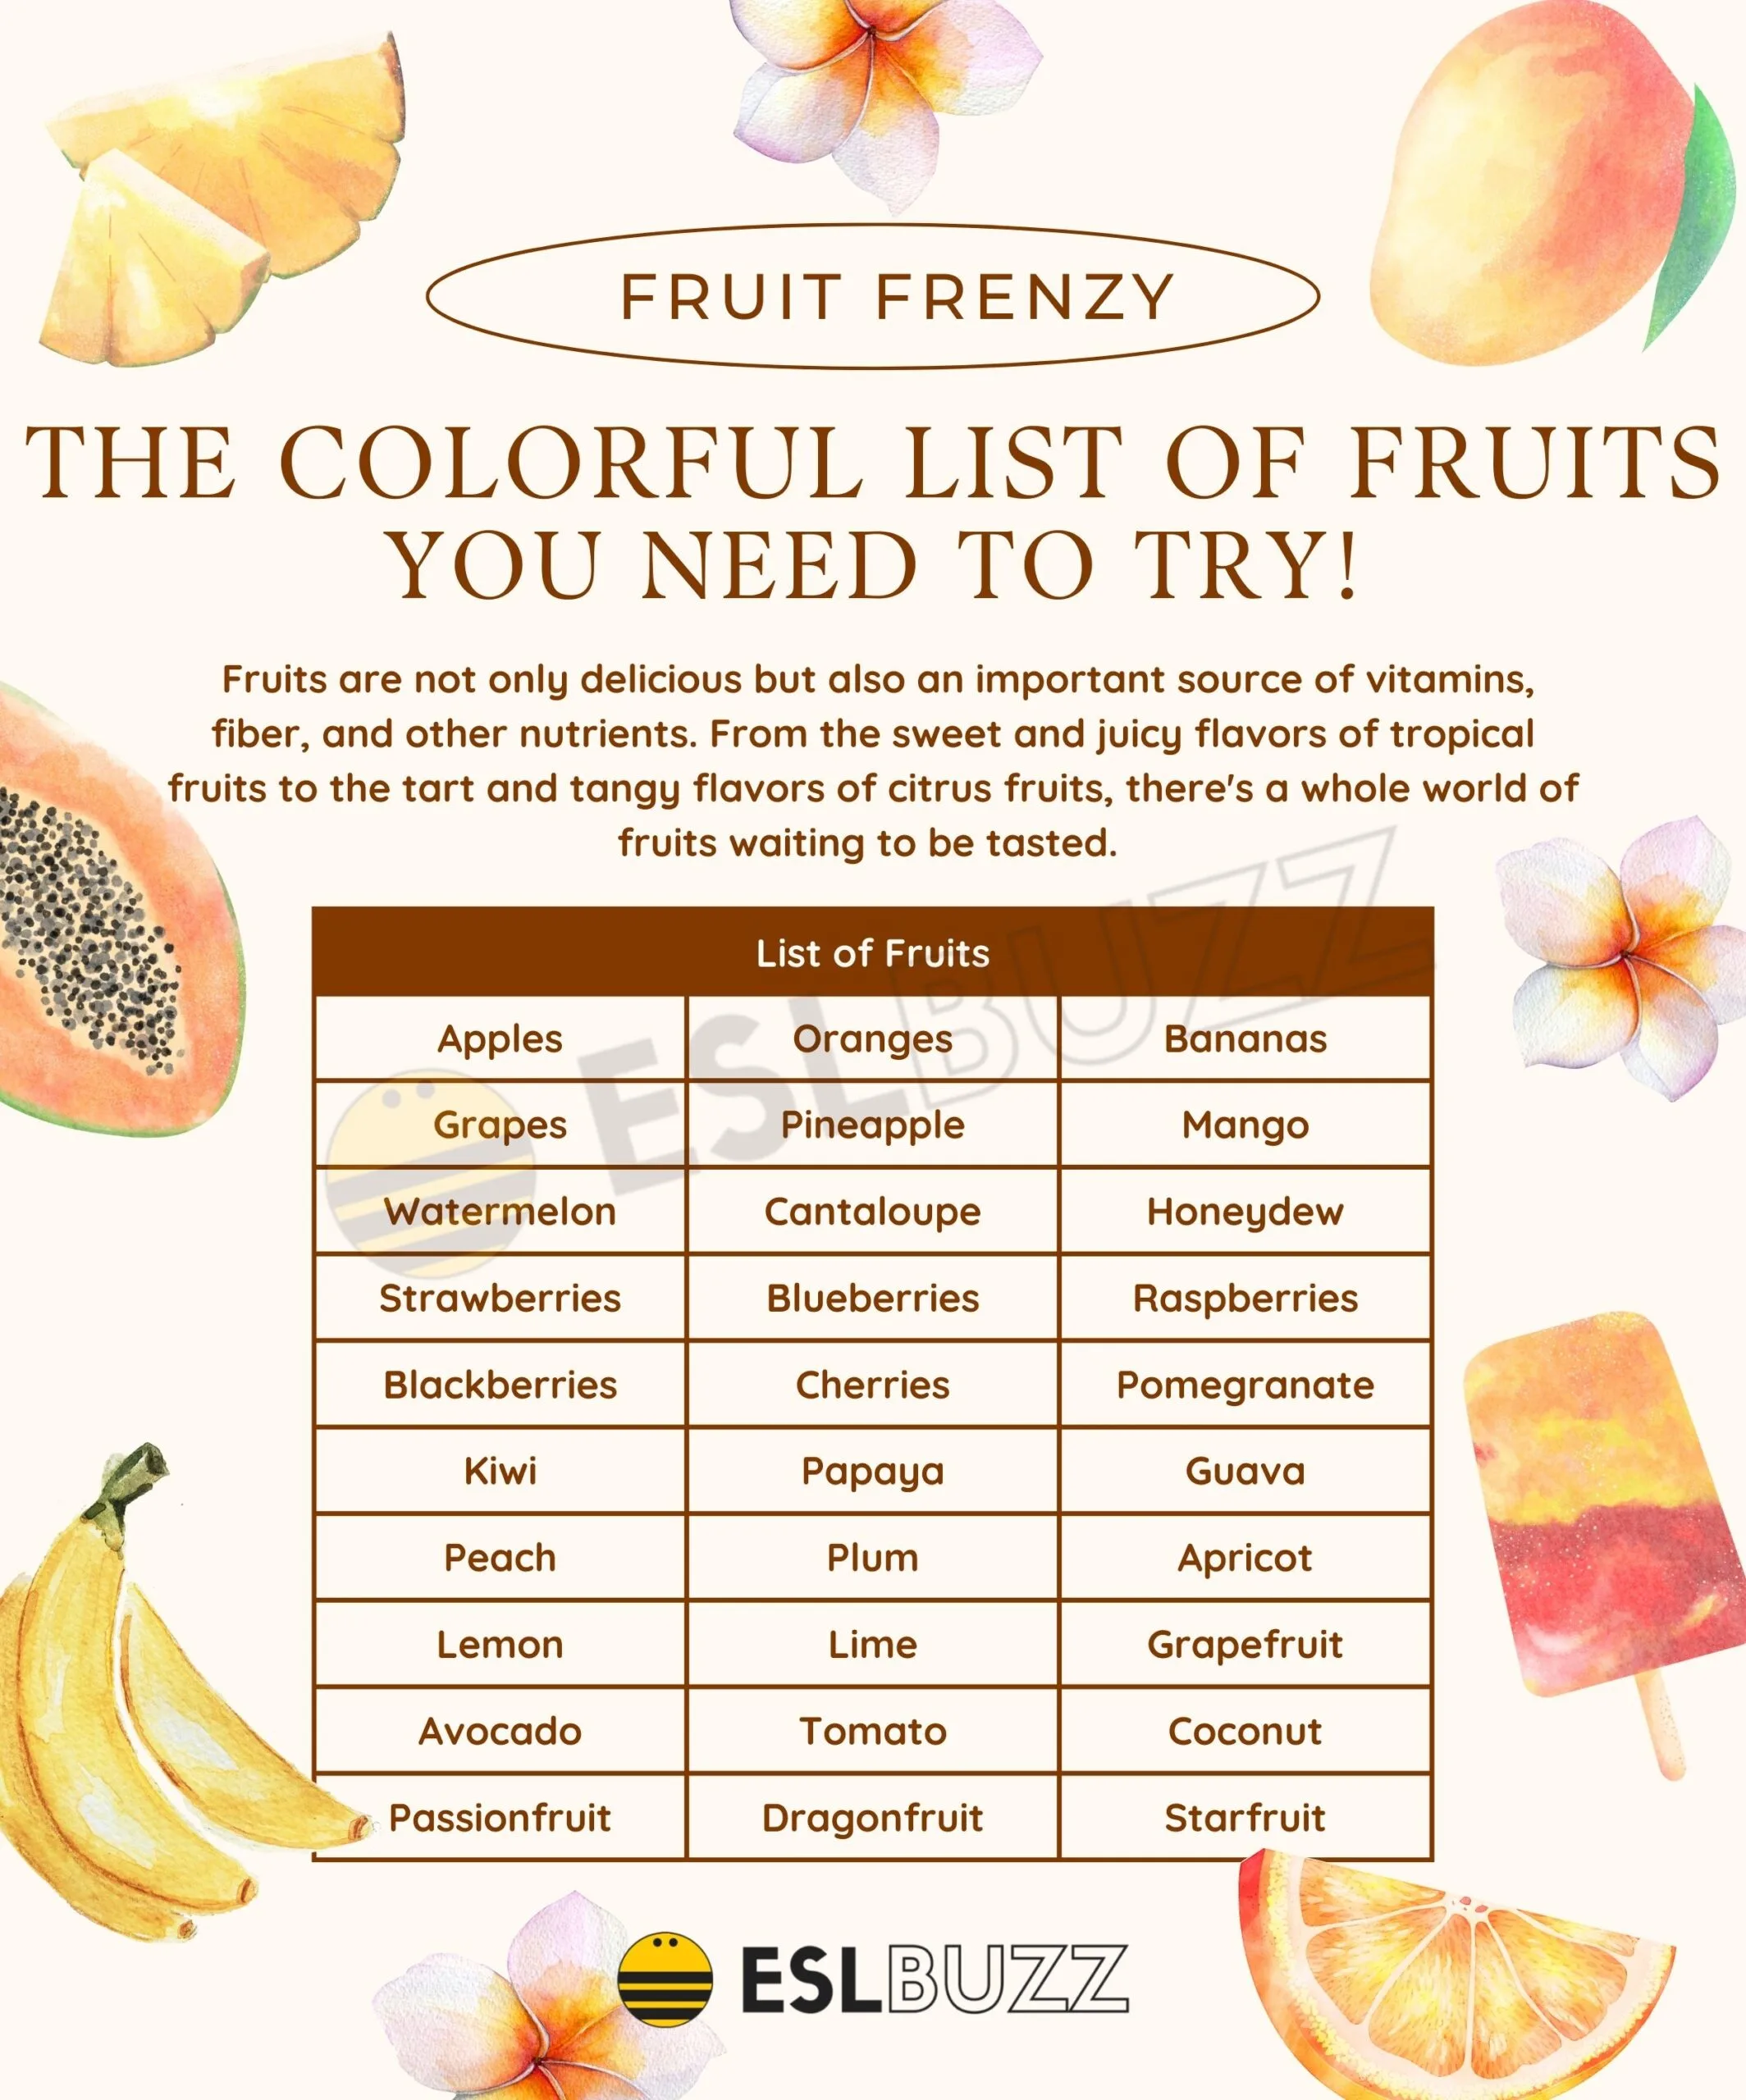
Cheese Grater with Handle: Enhancing Safety, Efficiency, and Versatility

– The Westmark Multipurpose Rotary Cheese & Vegetable Grater Cutter Slicer Shredder is currently priced at $19.99.
– It comes with three interchangeable stainless steel drums and can be used for grating, slicing, and shredding various types of cheese.
– The grater is suitable for Parmesan, Mozzarella, and other types of cheese.
– The item is white in color.
– Box graters, rasp graters, and rotary graters are outlined as the three main options for cheese graters.
– The Vivaant Cheese Grater is praised for its design and versatility in grating both hard and soft cheese.
– The Gorilla Grips Sharp Stainless Steel Zester is recommended for its smart design and effectiveness in fine grating tasks.
– The Spring Chef Professional Box Grater has a removable rubber base and four sides with coarse, medium, fine, and slicer blades.
– The Microplane Classic Series Zester produced perfect zest and performed well in hard cheese testing.
– The Zyliss SmoothGlide Dual Grater is compact, quick to clean, and has dual sides for textural options.
– The Microplane Specialty Series 4-Series Box Grater has four different blades for grating, slicing, and zesting.
– The Microplane Specialty Series 4-Series Box Grater is the best cheese grater among nearly two dozen tested.
– It was easy to use and required little effort from testers in all tests.
– It has four varied sides of sharp grates and aced all tests.
– It is versatile and user-friendly with non-slip feet, a comfortable grip handle, and a removable ribbon blade.
– It can grate both hard and soft cheeses into uniform pieces.
– It can also zest oranges effectively.
– It is dishwasher safe and easy to clean.
– It is on the pricier side for graters.
– Factors to consider when choosing a grater include ease of use/comfort, ease of cleaning, and shred size.
– There are different types of graters available, including manual options, attachments for electric appliances, and box graters.
– Zesters are mostly used for citrus fruits, while graters are more multipurpose.

Continue Reading

Microwave Safe Bowls: The Ultimate Guide for Safety

Here is the revised list:

– Most dishes labeled microwave-safe are safe to use in a microwave.
– Porcelain, stoneware, and ceramic without metallic paint or design are safe in a microwave.
– Glass dishes should be certified safe with a logo imprinted on them.
– Plain paper dishes labeled microwave-safe are safe to use, as some non-microwavable paper plates and cups are coated with plastic.
– A microwavable dish must distribute heat evenly and not be heated by microwave energy.
– Round or oval microwave-safe containers allow even heat distribution and efficient heating.
– Rectangular and square-shaped dishes may cause overheating or burning in the corners.
– Dyes, colorful pigments, or stains on certain containers may receive heat, so plain-looking dishes are recommended for efficient heating.
– Plastic containers labeled safe for microwave use are safe to use.
– Plastic containers should not be scratched, cracked, or dented as they may have added plastic leaching out into food.
– Microwavable takeout trays are for single use and should be disposed of properly after use.

Continue Reading

Star Anise Substitute: Exploring Spices for Exquisite Flavors

– Anise seed can be a substitute for star anise as they share a similar flavor, although they are not related.
– Ground star anise can also be used instead of whole star anise, but consider the difference in texture, especially in mulled cider or tea infusions.
– When using anise seeds as a substitute for star anise, use ½ teaspoon of anise seeds for one whole star anise.
– Cloves can be used as a substitute for star anise, providing sweetness and bitterness, but they have a stronger flavor.

Continue Reading

Drying Basil: Preserving Flavor and Maximizing Nutritional Benefits

– The article discusses different methods for drying basil, including air-drying, using the kitchen oven, or using a dehydrator.
– It also provides instructions and visuals for each method.
– This article provides step-by-step instructions for drying basil leaves using the microwave and/or the oven methods.
– The author mentions that drying basil can help prolong its life and preserve its flavor.
– They also suggest alternative methods for preserving the flavor closest to the fresh form, such as making and freezing pesto, freezing fresh basil leaves, or freezing basil as herb bombs.
– The article states that the homemade version of dried basil is better than storebought.
– The required ingredients for drying basil include basil leaves and a microwave oven, a regular oven, or a dehydrator oven.
– The article also provides tips for picking basil and recommends removing the stems before drying.
– The article provides instructions on how to dry basil leaves using an oven or microwave.
– When drying in an oven, preheat to the lowest setting possible (around 175°F) and spread the basil leaves in a single layer on a baking sheet.
– Dry for about 2.5 hours, checking every 15 minutes to prevent burning.
– The leaves should sound crunchy and change color to a dark green when done.
– In the microwave method, place a towel on a microwavable plate, arrange the leaves in a single file, and place another towel on top.
– Microwave in 30-second bursts, checking after each burst.
– The leaves should shrivel.
– The microwave method produces lesser flavor compared to oven or air-drying.
– To maximize flavor, store dried basil as whole leaves and crush them right before use.
– When substituting dried basil for fresh, use ¼ to ⅓ of the amount called for in the recipe.
– One tablespoon of fresh herbs is approximately equal to one teaspoon of dried herbs.
– Dried basil leaves last at least a year when stored in an airtight container in a cool and dark place.

Continue Reading

Sashimi Knife: A Masterful Tool for Perfecting Japanese Cuisine

1. Yanagiba: This knife has a slim blade in the shape of a willow leaf or Katana (sword). It is long and narrow, making it suitable for slicing tasks, especially for preparing fresh and visually appealing raw fishes (sashimi). It is popular in Western Japan.
2. Takohiki: This knife has a square shape with a longer blade. It is designed for the same purpose as Yanagiba, but not for slicing octopus. The edge line of Takohiki is almost straight, whereas Yanagiba’s edge line is more curved towards the tip. It was popular in Eastern Japan.
3. Fuguhiki: This knife was originally designed for cutting and slicing Blowfish Sashimi (Tessa). Its blade shape is similar to Yanagiba but has a narrower width and thinner blade. It is suitable for thinner cutting and slicing tasks.
4. Yoshihiro Shiroko sashimi chef knife: Handcrafted by Japanese artisans, made from high-carbon steel, with a hardness of 62 to 63 HRC. It has a concave grid and a flat rim, allowing it to slice through fish without damaging its surface and cells. Comes with a wooden sheath and a D-shaped handle made from magnolia or rosewood.
5. Cangshan X-7 sashimi chef knife: Forged from 67 layers of Japanese VG-Damascus high-carbon steel. Went through an ultra-6 heat treatment for toughness and wear resistance. Comes in 10-inch and 12-inch variants, with a 5.5-inch African blackwood handle and walnut Saya-style sheath. Excellent edge strength and retention. NSF International Certified.
6. Lucky Cook sashimi sushi knife: Made from high-carbon steel, 10-inch blade with a right-sided bevel for smooth slices. Non-slip wooden handle with an ergonomic grip. Considered a good choice for beginners.
7. Factors to consider when buying a sashimi knife: Sharpness, edge retention, blade length, material (such as Damascus Steel, VG-Max Steel, VG-10 Steel), handle quality (wooden handles).
8. Recommendation: Yoshihiro Shiroko Sashimi Chef Knife for its sharpness, wear resistance, durability, and ergonomic design.
9. Use of high-carbon steel in sashimi knives instead of stainless steel.

Continue Reading

Dough Proofer: Essential Tips and Methods for Perfectly Proofed Dough

– Professional bakers use a proof box to let dough rise at optimal conditions
– Replicate professional conditions at home
– Limitations of other methods for proofing dough
– Brod & Taylor bread proofer as a solution
– Easy-to-store folding bread proofer
– Consistent warmth and humidity for dough to rise
– Doubles as a slow cooker
– Aluminum base plate radiates heat for low-temperature warmth
– Can hold two large 2-pound loaves
– Water tray for improved humidity
– Temperature range of 70°F to 120°F for proofing dough
– Ideal for making casseroles and pot roasts (slow cooker mode)
– Can be used for making homemade yogurt, cultured butter, and melting and tempering chocolate
– Consistent temperature control.

Continue Reading

Prime Rib Temperature Chart: A Comprehensive Guide Demystifying Perfection

– The article provides a free printable temperature chart for cooking prime rib.
– The temperature guidelines for cooking a bone-in or boneless standing rib roast are as follows:
– Rare: 120-129°F, bright red center, lukewarm.
– Medium Rare: 130-134°F, bright red center, pink edges, warm.
– Medium: 135-144°F, pink and warm throughout.
– Medium Well: 145-154°F, slightly pink center and warm throughout.
– Well Done: 155-164°F, very little pink.
– It is recommended to use an instant read thermometer to measure the internal temperature of the prime rib as it cooks.
– The article suggests resting the roast for 10-15 minutes or 20-25 minutes, depending on the desired final temperature, as the roast will continue to increase in temperature while resting.
– The article also provides additional links to other recipes and guidelines for cooking prime rib.
– The article discusses the concept of a “perfect” prime rib recipe.
– The author states that there is no such thing as a perfect recipe and that it’s important to continue exploring and experimenting in the kitchen.
– The author describes a perfect prime rib as having a deep brown crust, juicy pink center, and a distinct dry-aging aroma.
– The article provides a snapshot of the current state of the author’s prime rib recipe.
– The author states that marbling is important for juiciness, flavor, and tenderness in prime rib.
– Buying “Prime” graded beef is suggested as a guarantee of good marbling.
– Prime rib has a high fat content and is marbled with fat. If someone does not like fat in their beef, prime rib may not be suitable for them.
– 100% grass-fed beef tends to be leaner, while grass-fed, grain-finished beef is richer in flavor.
– Dry-aging is a process where large cuts of meat are held in a temperature and humidity-controlled room for several weeks. This process enhances the flavor and tenderness of the meat.
– When buying aged beef, it is recommended to choose dry-aged beef rather than wet-aged beef. Wet-aging involves storing beef in a vacuum-sealed bag, which does not provide any flavor benefits.
– Dry-aging at home is not recommended unless the proper resources and techniques are available. Pseudo dry-aging, which involves loosely covering meat in the fridge for a few days, does not produce the same flavor as true dry-aged beef.
– True dry-aging at home is possible but requires the right cut of meat and the appropriate conditions.
– Buying bone-in beef allows for insulation during roasting, resulting in tender and juicy meat.
– It is recommended to season the prime rib with kosher salt at least 45 minutes before cooking, or preferably the day before, to enhance flavor.
– Roasting at low temperatures (around 200°F) prevents overcooking the outer layers of the meat.
– Slow roast the prime rib first, then brown it at the end to avoid overcooking.
– Using a thermometer is necessary to ensure perfectly cooked meat. The recommended temperature for medium rare is 115 to 120°F.
– Resting the meat after cooking improves juiciness and texture. Slicing a hot roast immediately out of the oven will cause juices to spill out, while properly rested meat retains the juice.
– The article mentions that the method described minimizes moisture loss and leaves very few drippings in the pan. However, without flavorful drippings, making a tasty sauce or gravy becomes challenging.
– One solution suggested is to sear beef shin or oxtail, deglaze the drippings with wine and stock, and roast everything together to create a flavorful jus.

Continue Reading

Apple Cutter: A Guide to Efficient, Safe Slicing

– The article is about an apple cutter, a kitchen tool for apple lovers.
– The apple cutter cores and cuts apples into eight pieces in one swift movement.
– It is perfect for cutting up apples, salads, or lunchtime snacks.
– The apple cutter is dishwasher safe.
– An apple corer is a device for removing the core and pips from an apple.
– It can also be used for similar fruits like pears or quince.
– Some apple corers have a handle with a circular cutting device at the end.
– The current price of an Apple Slicer with 12-Blade Extra Large Apple Cutter is $11.95. The previous price was $24.99. The apple cutter is made of stainless steel and is ultra-sharp. It is a heavy-duty tool designed for apples up to 4 inches in size.

Continue Reading