The Ultimate Guide: Finding the Perfect Substitute for Chinese Cooking Wine

– Shaoxing Wine, also known as Shaosing Wine, is a type of rice wine used in Chinese cooking.
– It is a key ingredient in many Chinese recipes, including stir fry sauces, soup broths, marinades, and wontons.
– Shaoxing Wine is made from rice and is popular due to its complex and sweet flavor.
– It is primarily used for cooking and not for drinking.
– In terms of substitutes, dry sherry, mirin (a Japanese sweet cooking wine), and cooking sake (Japanese rice wine) are recommended.
– For non-alcoholic substitutes, using chicken broth in sauces is suggested, although it may not provide the same outcome as using wine.
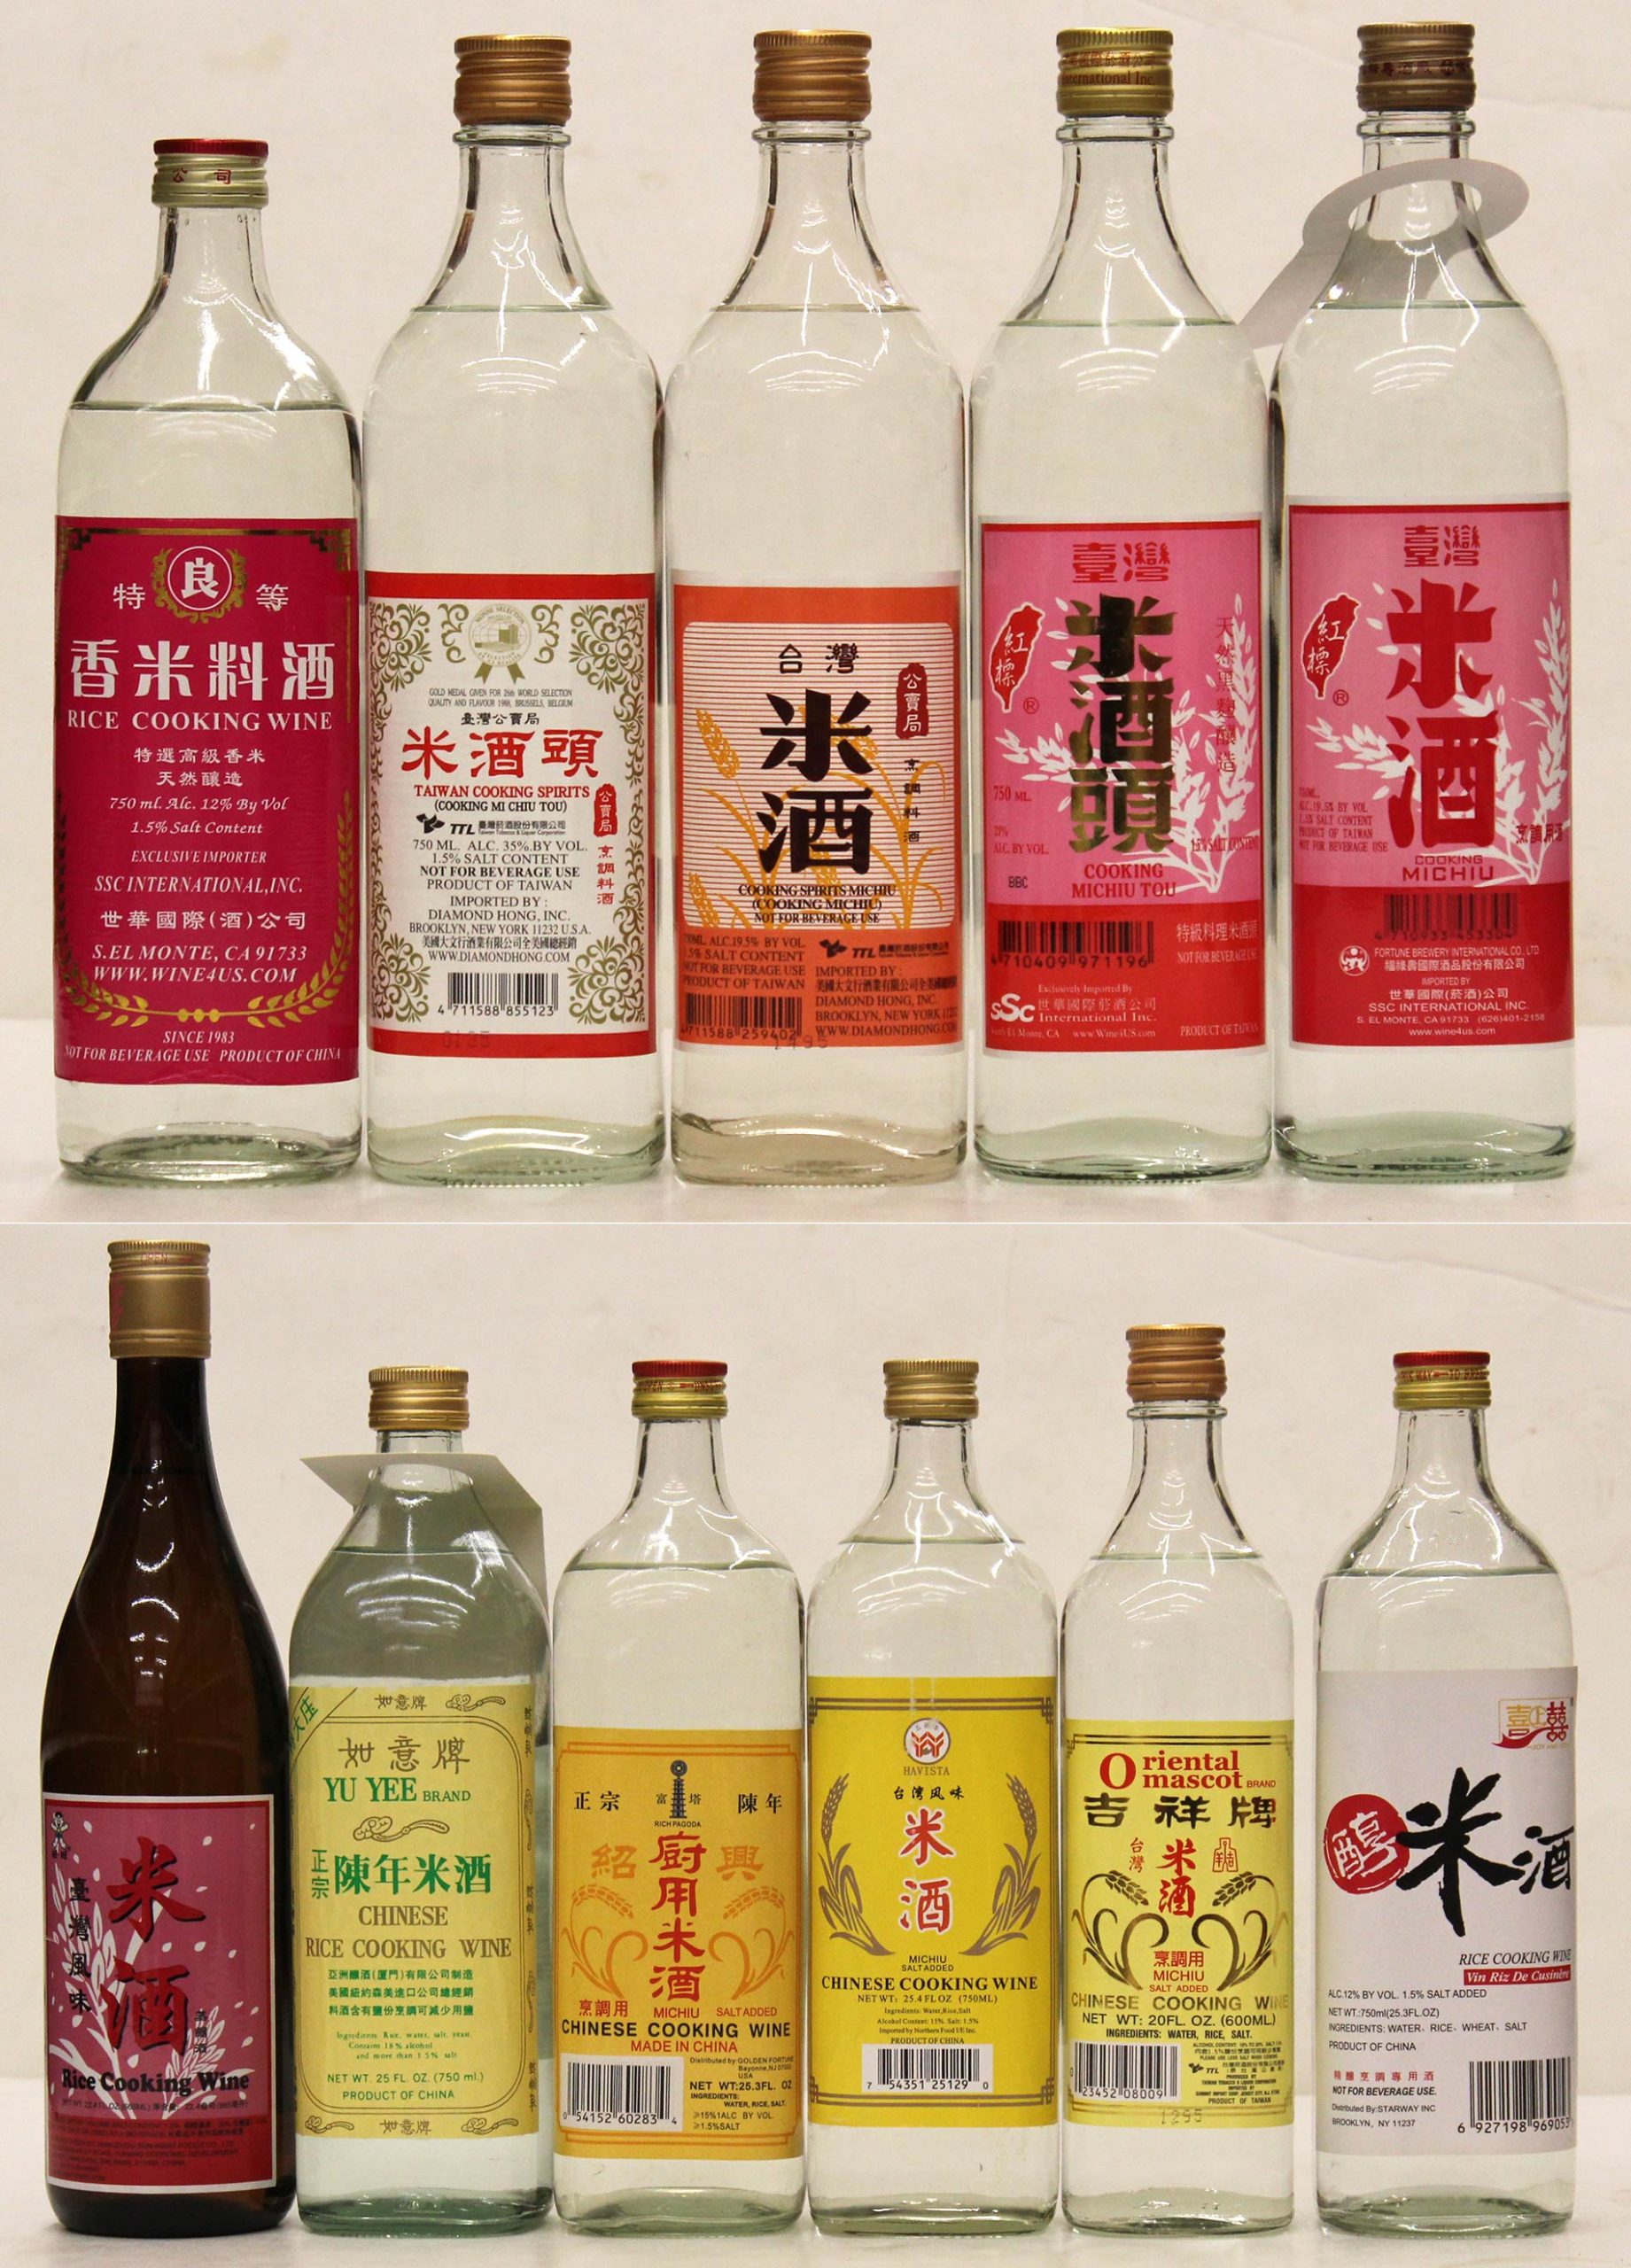
– Shaoxing wine is commonly used and can be found in Asian grocery stores, with brands like Double Phoenix being affordable options.
– The article mentions that a brand called Pandaroo sells a substitute for Chinese cooking wine in Australian supermarkets.
– It advises that Shaoxing wine does not need to be refrigerated once opened and can be stored in a pantry for years.

Continue Reading

What Does Undercooked Chicken Look Like: A Visual Guide to Spotting Potential Risks

– Undercooked chicken will appear raw and pink on the inside and outside.
– If the chicken is slightly pink or if the juices are red or pink, it is likely not cooked through.
– There should be no blood present when cutting into the thickest part of the meat.
– Undercooked chicken will lack flavor and have a raw, slightly slimy texture.
– It is important to know if chicken is undercooked to avoid foodborne illnesses like salmonella.
– The moisture test: pressing the chicken with your finger and clear juices indicate it is cooked through, pink or red juices mean it needs more cooking.
– The color test: pink or red flesh indicates it needs more cooking, gray or white flesh means it is safe to eat.
– The size reduction test: if the meat has significantly shrunk in size, it may still be raw.
– The time test: each pound of chicken should cook for at least 20 minutes at 350 degrees Fahrenheit. Adjust accordingly for different cooking methods or temperatures.
– Chicken should be cooked at 350 degrees Fahrenheit for 20 minutes per pound of boneless chicken.
– Internal temperature should reach at least 165°F before the chicken is safe to consume.
– Signs of overcooked chicken include dryness and toughness.
– Chicken should feel firm and springy when pressed with your index finger when cooked through.
– Undercooked chicken can cause food poisoning.
– Symptoms of food poisoning from undercooked chicken can appear within two days.
– Antibiotics may be required for a full recovery in severe cases of food poisoning.
– Undercooked chicken may not necessarily be pink.
– The USDA recommends heating chicken until all parts reach a minimum internal temperature of 165°F.
– Consuming undercooked chicken can lead to bacterial infections such as Salmonella and Campylobacter, which can cause symptoms like abdominal cramps, nausea, vomiting, and diarrhea.
– Every 25th package of chicken has the potential to be contaminated with Salmonella, so even slightly undercooked chicken is not safe to consume.
– Reheating undercooked chicken until fully cooked is advisable.

Continue Reading

Can you refreeze chicken safely without compromising taste?

– There are various ways to thaw chicken: in the refrigerator, in the microwave, or in cold water.
– Thawing chicken in the refrigerator is the best option, although it takes one to two days.
– Chicken thawed in the refrigerator can be refrozen as is within two days of thawing.
– If chicken is thawed in the microwave or in cold water, it must be cooked before being refrozen.
– Thawing chicken in the microwave may cause parts of the chicken to warm and cook, making it unsafe to refreeze without fully cooking it.
– Chicken thawed in cold water also needs to be cooked before refreezing, as maintaining a consistently cold temperature is difficult.
– Chicken should be cooked to a minimum internal temperature of 165°F.
– The bottom line is that you can refreeze chicken, but it must be cooked first if thawed in the microwave or in cold water.

Continue Reading

How to Clean Salmon: Tips and Techniques to Ensure Freshness and Flavor

– Cleaning salmon before cooking is important to remove surface contaminants and bacteria
– It eliminates impurities like sand and dirt
– It removes foul odor
– It ensures even cooking
– Tools needed: clean cutting board, sharp knife (optional for scaling and gutting), spoon (optional for gutting), paper towels
– Steps for cleaning salmon before cooking: rinse the salmon under cold running water, pat dry with paper towels
– Optional steps: remove scales using the backside of a knife or fish scaler, gut the salmon by making a shallow incision along the belly and removing the guts, rinse the cavity thoroughly
– Optional step: remove gills by gently pulling them out from the head-end of the fish
– Optional step: trim off fins and tail or cut the salmon into fillets or steaks
– Optional step: debone the fillets using fish tweezers or pliers
– When cutting salmon into steaks, remove the ribs by sliding a knife between the flesh and rib membrane
– After rinsing the salmon, wrap it tightly in plastic to minimize oxygen exposure
– Store salmon in the coldest part of the refrigerator (at least 32F) to keep it from spoiling
– Fresh salmon should keep for about two days in the fridge when properly wrapped
– Wash hands thoroughly with soap and water after handling raw fish
– Clean all surfaces and utensils that came into contact with the fish to avoid cross-contamination
– Cook salmon to the proper internal temperature of 145°F or 63°C
– Properly cleaning salmon ensures it is free of harmful bacteria, pathogens, and dirt
– Cleaning salmon makes for a visually appealing dish and prepares it to absorb desired flavors.

Continue Reading

Can you microwave Ziploc bags? Safety and guidelines

– The article discusses whether Ziploc bags can be used in the microwave.
– Ziploc bags can be used as a microwave cooking bag.
– One suggested recipe using Ziploc bags is microwave corn on the cob.
– Ziploc bags are microwave safe.
– When steaming food in a Ziploc bag, caution should be taken as they can get very hot and release steam quickly.
– Only bags labeled as microwave safe, such as Ziploc bags, can be used in the microwave.
– Other plastic bags, like supermarket carrier bags, are not safe for microwaving.
– Vacuum-sealed bags designed for cooking, such as those used in sous vide machines, can also be microwaved.
– The author uses Ziploc bags for various cooking purposes, including storing leftovers and reheating food in the microwave.

Continue Reading

How to Reheat Shrimp: Best Methods for Delicious Results

– The article provides tips on how to reheat shrimp using different methods.
– The oven method is recommended for maintaining texture.
– The stove method is the author’s go-to method.
– The steamer method is mentioned as a way to reheat shrimp without drying it out.
– The sooner shrimp is reheated, the fresher it will taste.
– Steaming method: Fill a pot with water, place a steamer basket inside, and put the shrimp in a single layer in the basket. Steam for 2-3 minutes.
– Air fryer method: Preheat the air fryer to 300°F, spray the basket with oil or use parchment paper, place the shrimp in a single layer, and reheat for 2 minutes on each side.
– Microwave method: Place the shrimp in a microwave-safe container, sprinkle with a bit of water, seal the container, and microwave for 1-2 minutes on high.
– Fried shrimp can be reheated using the same methods as unfried shrimp, except for steaming.
– Other methods for reheating fried shrimp include using the microwave, stovetop, oven, air fryer, flash frying, and broiling.
– The article provides tips on how to reheat shrimp scampi and shrimp boil leftovers.
– The recommended methods for reheating shrimp scampi are using the microwave, stove, or oven.
– For larger servings, the shrimp scampi can be placed in an oven-safe dish, covered with foil, and heated for about 10-15 minutes.
– Reheating shrimp boil involves placing everything in a microwave-safe bowl, covering, and reheating.
– Another option for shrimp boil is to simmer it in extra stock on the stovetop until warm.
– Leftover shrimp can be used in various cuisines such as Mexican, Thai, Italian, or Southern dishes.
– Shrimp can overcook quickly, resulting in a rubbery and tough texture.
– Reheating shrimp should be done at a lower temperature.
– Letting leftover shrimp come to room temperature helps prevent overcooking.
– Adding liquid to the pan while reheating shrimp helps prevent drying out.
– Reheating shrimp should only take five to six minutes, any longer risks overcooking.

Continue Reading

Baking Thin Chicken Breast: Expert Tips for Juicy, Flavorful Results

– Thin sliced chicken breasts are simply seasoned and baked quickly for a simple and delicious dinner.
– The method for baking chicken breasts results in tender and flavor-packed chicken.
– The recipe can be customized by adding different toppings or seasoning blends.
– Equipment needed includes a cutting board, chef’s knife, baking sheet, pastry brush or spoon, plastic wrap, kitchen mallet or rolling pin, and tongs.
– Ingredients needed are 1 pound chicken breasts, 2 tablespoons olive oil, salt, and pepper.
– The oven should be preheated to 350°.
– The chicken breasts should be sliced in half lengthwise and pounded or rolled between plastic wrap until they are about 1/2 inch thick and of equal thickness.
– The baking pan should be prepared by adding 1 tablespoon of olive oil and spreading it over the bottom with a pastry brush or spoon.
– The chicken should be placed on the baking pan and seasoned with the remaining olive oil, salt, and pepper.
– The chicken should be baked for 15-20 minutes or until the internal temperature reaches 165°F.
– It is recommended to use a meat thermometer to check the internal temperature.
– After reaching 165°F, remove from the oven immediately to prevent dry chicken.
– Let the chicken rest for 5 minutes before serving.
– The key to baking thin sliced chicken breast in the oven is slicing each chicken breast thin and then pounding until each piece has equal thickness.
– Baked chicken breasts can be served with any side dish.
– Some recommended side dishes are salad and rolls.
– Thin sliced baked chicken breasts are versatile and can be sliced, diced, or shredded to incorporate into any recipe.
– There are gluten-free recipes available.
– The recipe includes instructions for kid cooks with helper steps denoted by a ⭐️ symbol.

Continue Reading

How to Heat Up Honey Baked Ham: Quick and Delicious Methods for Perfection

– Honey-baked ham is a popular main course for holidays and special events.
– Leftover honey-baked ham can be reheated using various methods.
– Reheating methods include warming in the oven, skillet, and microwave.
– These methods help retain the moist flavor of the ham.
– HoneyBaked hams are fully cooked and should be reheated gently in a 325-to-350 degree oven until the internal temperature reaches 135 degrees.
– Reheating can also be done in the microwave.
– Other fully cooked hams should be reheated in a roasting pan with water or a cola/soft drink in the bottom, covered tightly with foil, and heated in a 325-degree oven until it reaches an internal temperature of 135 to 140 degrees.
– Spiral-sliced hams should be placed cut side down in a baking dish.
– For fully cooked hams that are not spiral sliced, remove the skin, score the fat layer, and heat in a 325-to-350 degree oven until heated through and internal temperature reaches 135 degrees.
– Basting with pan juices or glaze is optional.

Continue Reading

Vegetable Broth vs Stock: Nutritional Benefits & Culinary Differences

– Broth is made from meat and vegetables, while stock is made with bones.
– Stock has a thicker, viscous texture due to simmering collagen-rich bones.
– Vegetable broth and stock are the same thing, but broth may contain salt.
– Stock is generally thicker and more flavorful than broth.
– White stock is made by blanching bones before simmering, while brown stock is made with roasted bones.
– Stock contains more calories, fat, and carbohydrates than broth, but also more protein, vitamins, and minerals.
– Bone broth is a type of stock that is simmered for a long time and may have added apple cider vinegar.
– Making stock or broth at home allows you to control sodium levels and increase nutrient and antioxidant levels.
– Stock is commonly used as a base for dishes, to make gravy, soups, stews, and prepare grains.
– Broth is usually a clear soup made from simmering meat and vegetables, with variations for fish and shellfish.
– Store-bought stock can be pricier due to being more labor-intensive to produce.
– Soups, broths, and stocks can be high in sodium, so it’s important to check labels for low-sodium or unsalted options.
– Bone broth has gained popularity but may have benefits for gastrointestinal disorders.
– Vegetable broth does not contain as much collagen, vitamins, minerals, and anti-inflammatory benefits as stock.
– Stock has a gelatinous consistency and a richer taste due to collagen and longer cooking time.
– Vegetable stock and vegetable broth are popular among plant-based and vegan diets.
– Store-bought stock contains more vitamins and minerals per cup compared to store-bought broth.
– Consommé is a clarified stock made by simmering with egg white and straining.
– Bouillon is made from dehydrated stock and is sold as cubes, powder, or paste.
– Whether stock or broth is healthier depends on individual goals and needs.
– Homemade stock is made by simmering a whole chicken with vegetables and herbs, then straining the liquid.
– Broth and stock can be used interchangeably in a pinch.

Continue Reading