Imagine sitting around a crackling campfire, the delicious aroma of freshly baked pies wafting through the air.
And there, in the midst of this outdoor adventure, stands the humble pudgy pie maker.
With its cast iron charm, this ingenious device takes the art of sandwich making to new heights.
Get ready to unlock a world of tasty possibilities as we delve into the realms of sandwich and pie perfection in this tantalizing article.
pudgy pie maker
A pudgy pie maker, also known as a pie iron, is a device used to cook grilled and pressed sandwiches and pies over a campfire.
Made of cast iron, it seals and toasts sandwiches or pies filled with desired ingredients in just 3 to 5 minutes.
To use a pie iron, a sandwich is made with fillings and bread, buttered, and placed inside the iron.
It is then cooked over medium to high heat for about 3 to 5 minutes per side, or 6 to 10 minutes total.
Cooking spray can be used to prevent sticking.
The article provides various recipe ideas for sandwiches and pies that can be made using a pie iron.
Key Points:
- A pudgy pie maker, also known as a pie iron, is a device for cooking grilled and pressed sandwiches and pies over a campfire.
- Made of cast iron, it seals and toasts sandwiches or pies in 3 to 5 minutes.
- To use a pie iron, a sandwich is made with fillings and bread, buttered, and placed inside the iron.
- It is then cooked over medium to high heat for about 3 to 5 minutes per side, or 6 to 10 minutes total.
- Cooking spray can be used to prevent sticking.
- The article provides recipe ideas for sandwiches and pies that can be made using a pie iron.
pudgy pie maker – Watch Video
💡
Pro Tips:
1. The pudgy pie maker, also known as a sandwich iron or pie iron, dates back to the early 1900s and was originally used for cooking over an open fire while camping.
2. Did you know that the original pudgy pie maker was made with cast iron? Nowadays, you can find versions made from other materials like aluminum or stainless steel.
3. Pudgy pies became popular among miners during the California Gold Rush, as they were an easy and portable way to prepare a warm meal in the wilderness.
4. While traditionally used to make sweet and savory pies, the pudgy pie maker can also be used to cook other creative recipes like grilled cheese sandwiches, quesadillas, or even pizzas.
5. Pudgy pies can be traced back to Italian-style panini presses called panini irons, which were used to make toasted sandwiches long before the pudgy pie maker was introduced.
1. What Is A Pie Iron?
A Pie Iron is a versatile cooking device that allows you to make grilled and pressed sandwiches, as well as pies, right over a campfire. Made of sturdy cast iron, this tool is designed to seal and toast bread filled with your favorite ingredients to create warm and delicious treats in just a few minutes. Also known as pudgy pies, hobo pies, mountain pies, or jaffles, these creations are perfect for outdoor cooking adventures.
2. How To Use A Cast Iron Pie Iron
When using a cast iron pie iron, it is essential to season it before first use. To do this, wash off any protective wax, coat it with oil, and heat it. This seasoning process ensures that your pie iron maintains its durability and provides even heating. Make sure to choose a cast iron pie iron with a long handle featuring a heatproof grip and a clasp to lock it closed securely.
For cooking, start by making a sandwich with your desired fillings and bread. Butter the bread and place it in the pie iron. It is crucial not to overfill the pie iron to ensure that the heat can circulate properly. Cook the sandwich over medium to high heat for approximately 3 to 5 minutes per side or 6 to 10 minutes total. Avoid placing the pie iron directly into the fire, as it may cause uneven cooking or damage the tool. Instead, hold it over the flame or use a campfire grill grate for a more controlled cooking experience. To prevent sticking, consider using cooking spray as an extra insurance measure.
3. Tips For Using A Pie Iron
To make the most out of your pie iron cooking experience, here are some essential tips to keep in mind:
-
Use cooking spray: Applying cooking spray to the pie iron before cooking can help prevent sticking and ensure easy removal of your delicious creations.
-
Don’t overfill the pie iron: It’s essential to leave some space inside the pie iron to allow the ingredients to cook properly and to prevent the fillings from oozing out. As a general rule, fill the pie iron about three-quarters full.
-
Use precooked ingredients: To ensure that your fillings are properly heated, consider using pre-cooked ingredients. This will reduce the cooking time and ensure even heating throughout.
-
Preheat the press: Before placing your sandwich or pie in the pie iron, it’s a good idea to preheat the press over the fire. This helps to ensure that the cooking process starts immediately, resulting in a more evenly cooked and toasted treat.
-
Cook over medium to high heat: Cooking your pudgy pies over medium to high heat ensures that they cook evenly and develop a golden brown color. Adjust the heat as needed to achieve the desired results.
-
Flip the pie during cooking: To ensure even cooking on both sides, remember to flip the pie iron halfway through the cooking process. This will help to achieve a uniform toast and seal.
-
Check the pies often: As cooking times can vary depending on the heat intensity of the fire, it’s essential to check your pies frequently. This will prevent them from burning and allow you to achieve the perfect level of toasting.
4. Recipe Ideas: Sticky Pecan Cinnamon Rolls And Breakfast Sandwich
One of the delights of using a pie iron is the endless recipe possibilities. Here are two recipe ideas to get you started on your pudgy pie journey:
Sticky Pecan Cinnamon Rolls: Start by spraying the pie iron with non-stick spray. Take a piece of refrigerated biscuit dough and flatten it slightly. Dip both sides in a mixture of melted butter and cinnamon sugar. Place the coated dough in one side of the pie iron and add a sprinkle of chopped pecans and a drizzle of maple syrup. Cover with the other side of the pie iron and cook for 3 to 4 minutes per side until golden brown and gooey.
Breakfast Sandwich: Create the perfect breakfast treat by layering precooked bacon, a scrambled egg, and a slice of cheese between two slices of buttered bread. Place the sandwich in the pie iron and cook for 3 to 5 minutes per side until the bread is toasted and the cheese is melted. Enjoy a hearty and satisfying breakfast on your outdoor adventure.
5. Making “Pudgy Pies”: Sausage Patty And Cheese Sandwich
A classic pudgy pie is the sausage patty and cheese sandwich. To make this mouthwatering treat, follow these steps:
- Place a sausage patty and a slice of cheese between two slices of bread.
- Butter the outer sides of the bread.
- Preheat and oil a pie iron.
- Place the sandwich in the pie iron.
- Cook over medium to high heat for about 3 to 5 minutes per side.
- Wait until the bread turns golden brown and crispy.
The result is a warm and satisfying sandwich with perfectly melted cheese and a flavorful sausage patty.
6. Vegetarian Version Of Pudgy Pie
For those who prefer a meat-free option, you can create a delicious vegetarian pudgy pie by omitting the sausage patty or replacing it with a plant-based alternative. Layer your choice of vegetables, such as grilled peppers and onions, along with a slice of cheese between two slices of bread. Butter the bread, place it in the pie iron, and cook according to the instructions above. This vegetarian version keeps all the flavors and textures of a traditional pudgy pie while catering to a different dietary preference.
7. Recipe: Loaded Pie Iron Hash Browns
To make a flavorful and fulfilling meal, consider preparing loaded pie iron hash browns. Here’s how you can create this delicious dish:
- Layer shredded hash browns, crispy bacon pieces, chopped green onions, and shredded cheese inside the pie iron.
- Close the pie iron and cook for about 3 to 5 minutes per side until the hash browns turn golden brown and the cheese melts.
- Enjoy this delightful recipe as a hearty breakfast or a mouthwatering campfire side dish.
If you’re craving a savory and satisfying option, loaded pie iron hash browns are the way to go!
Now let’s see the improved version without the markdown formatting:
To make a flavorful and fulfilling meal, consider preparing loaded pie iron hash browns. Here’s how you can create this delicious dish:
- Layer shredded hash browns, crispy bacon pieces, chopped green onions, and shredded cheese inside the pie iron.
- Close the pie iron and cook for about 3 to 5 minutes per side until the hash browns turn golden brown and the cheese melts.
- Enjoy this delightful recipe as a hearty breakfast or a mouthwatering campfire side dish.
If you’re craving a savory and satisfying option, loaded pie iron hash browns are the way to go!
8. Recipe: Spicy Italian Ham And Cheese Panini
Add a touch of Italian flair to your camping meals with a spicy Italian ham and cheese panini.
Here’s how you can make it:
- Start by spreading your favorite spicy mayo or mustard on both slices of bread.
- Layer sliced ham, Swiss cheese, and pepperoncini peppers between the bread slices.
- Butter the outer sides of the bread.
- Place the sandwich in the pie iron.
- Cook for about 3 to 5 minutes per side until the bread is toasted and the cheese has melted.
- Voila! You’ll be left with a delightful combination of flavors and a warm, gooey panini.
Enjoy your Italian-inspired camping meal!
9. Recipe: Mushroom, Bacon, And Swiss Panini
If you’re a fan of mushrooms, bacon, and Swiss cheese, then this recipe is a must-try. Begin by cooking bacon until crispy, then remove it from the pan. In the same pan, sauté sliced mushrooms until they soften and develop a rich flavor. Layer the cooked bacon, sautéed mushrooms, and Swiss cheese between slices of bread. Butter the outer sides of the bread and place the sandwich in the pie iron. Cook for approximately 3 to 5 minutes per side until the bread is toasted and the cheese has melted. Indulge in the savory combination of flavors and textures in this delicious panini.
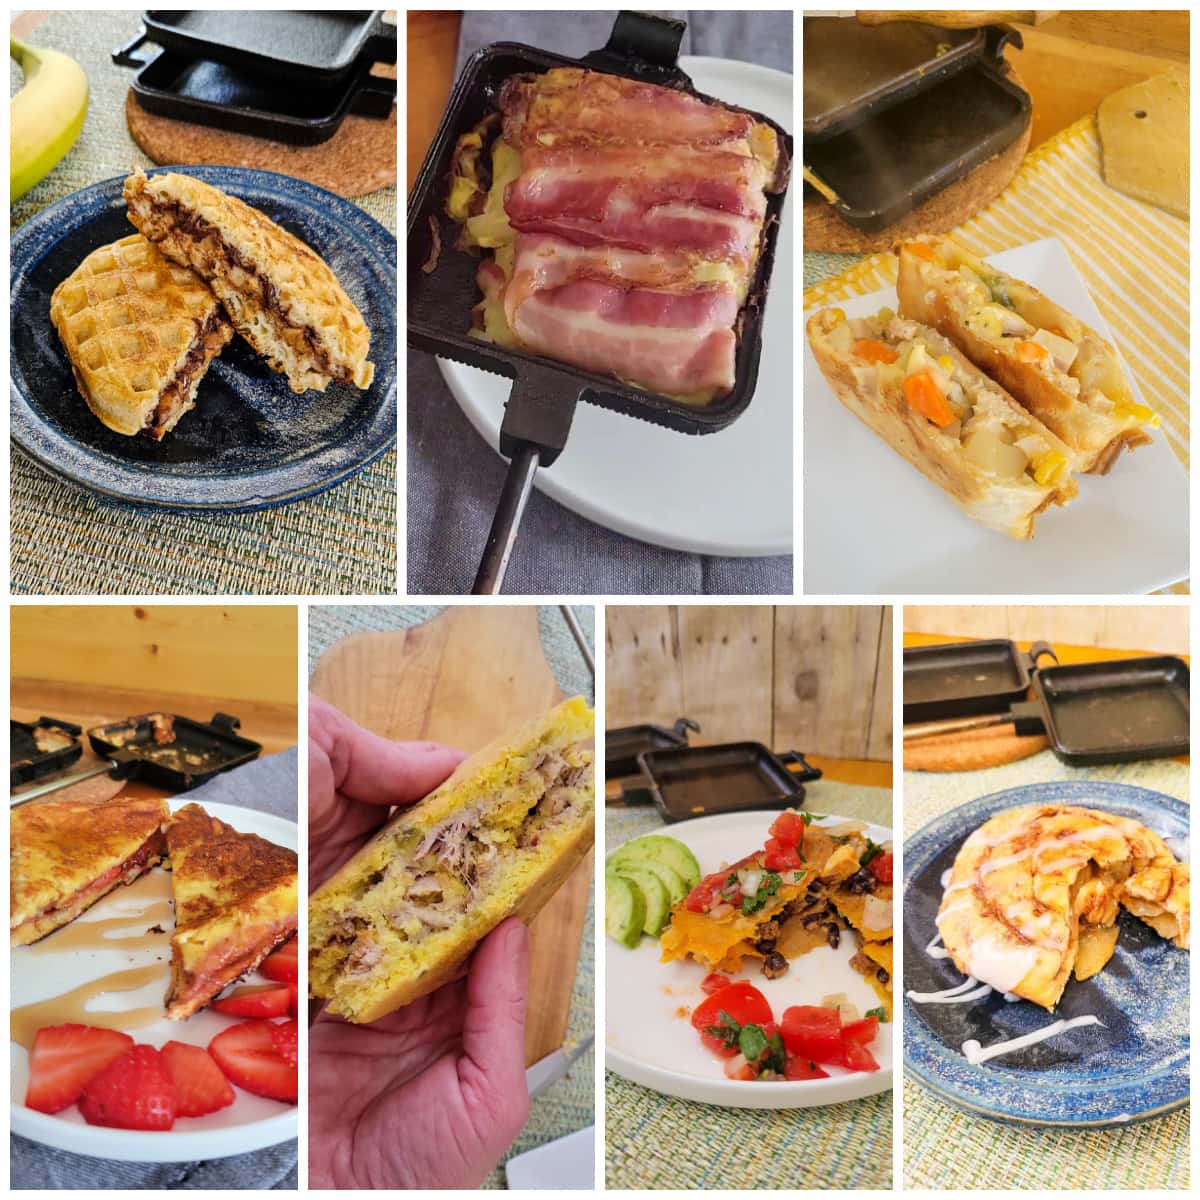
10. Pie Recipes: Bacon, Egg, And Cheese Sandwich Pie, Pepperoni Pizza Pie, Monkey Bread, And S’More Waffles
The versatility of the pie iron extends beyond sandwiches. You can also create delectable pies using this camping tool. Here are four pie recipes to enjoy around the campfire:
Bacon, Egg, And Cheese Sandwich Pie: Spray the pie iron with non-stick spray and place a slice of bread on one side. Top with crispy cooked bacon, a sunny-side-up egg, and a slice of cheese. Cover with another slice of bread and close the pie iron. Cook for 3 to 4 minutes per side until golden brown.
Pepperoni Pizza Pie: Drizzle olive oil on both sides of the pie iron. Stretch pizza dough onto one side of the iron and top with pizza sauce, pepperoni slices, and shredded cheese. Cover with another piece of stretched dough and close the pie iron. Cook for 3 to 4 minutes per side until the crust is golden brown and the cheese is bubbly.
Monkey Bread: Divide refrigerated biscuit dough into nine pieces and dip each piece in melted butter. Roll the buttered dough in cinnamon sugar and place the sugar-coated balls on one side of the pie iron. Cover with the other side and cook for 3 to 4 minutes per side until deep golden brown. Enjoy the warm, gooey sweetness of this classic treat.
S’More Waffles: Dip frozen waffles in melted butter and cinnamon sugar. Place one waffle in one side of the pie iron and top with chocolate or Nutella and marshmallows. Cover with the other waffle and close the pie iron. Cook for 2 to 3 minutes per side until the waffles are well toasted and the marshmallows are gooey. Indulge in the irresistible combination of chocolate, marshmallow, and crispy waffles.
In conclusion, a pie iron is a fantastic tool for creating delicious outdoor treats. With its versatility and ease of use, you can experiment with various fillings and bread options to suit your taste preferences. From savory sandwiches to sweet dessert pies, this cast iron device opens up a world of culinary possibilities around the campfire.
- So grab your pie iron, gather around the fire, and embark on an epic outdoor cooking adventure with pudgy pies that will satisfy your taste buds and elevate your camping experience.
💡
You may need to know these questions about pudgy pie maker
What is a pudgy pie maker?
A pudgy pie maker is a versatile cooking appliance designed for making delicious pies in a compact and convenient manner. This ingenious device consists of two hinged plates made of cast iron or aluminum, typically in the shape of rounds or squares, with a concave interior. The long handles attached to the plates allow for easy handling and flipping of the pie iron while cooking. With the pudgy pie maker, one can create a variety of tasty pies by sandwiching ingredients such as bread, pastry, fruit, or even meat between the two plates and cooking them over a heat source. This portable and user-friendly gadget not only makes cooking pies an enjoyable experience but also delivers delightful and perfectly cooked treats that can be enjoyed on picnics, camping trips, or at home in the backyard.
Do you have to season pudgy pie maker?
Yes, it is important to season a pudgy pie maker just like you would season a cast iron pan. By seasoning the pie maker, you create a non-stick surface that prevents your camp snacks from sticking to the pans. With each use, the pudgy pie maker will become more seasoned, making it more durable and long-lasting, ensuring years of delicious campfire cooking.
What is another name for pudgie pie?
One might refer to pudgie pie as a delicious campfire creation with an alternative moniker of “hobo pie.” This delectable treat, commonly made by sandwiching various fillings like fruit or savory ingredients between two slices of bread and grilling it to perfection, bears a name that pays homage to its humble origins. The toasty and comforting nature of this concoction has also led to it being affectionately known as a “toastie,” capturing the essence of this simple yet satisfying snack.
Is it worth buying a pie maker?
Investing in a pie maker can be a worthwhile decision for those seeking convenient and delicious homemade pies. The compact size of the machine ensures it won’t clutter your kitchen, while its ability to create expertly sealed pies is a game-changer. With a pie maker, you can whip up a delectable meal in just 15 minutes, excluding the time spent on filling preparations. Whether you need a quick dinner, a simple lunch, or a tasty after-school snack, this versatile appliance proves its value time and time again.
Reference source
https://en.wikipedia.org/wiki/Pie_iron
https://togorv.com/rv-living/pie-iron-recipes-cooking-tips-for-campground/
https://www.foodandwine.com/lifestyle/pie-iron-how-use
https://www.sandwichtribunal.com/2018/08/pudgy-pie-aka-the-jaffle/