How to Reheat Pulled Pork: Ensuring Juicy Tenderness

– The article discusses different methods for reheating pulled pork leftovers
– It mentions that 40% of all food in the US gets wasted each year, equivalent to about 108 billion pounds
– The article suggests that reheating leftovers in unique and tasty ways can help reduce food waste and save money
– The six best methods for reheating pulled pork are mentioned as the oven, stovetop, air fryer, smoker, grill, or crockpot
– Proper storage and refrigeration of leftover pork is emphasized to avoid foodborne illnesses
– Reheating pulled pork in the oven is recommended, with a low temperature of around 325 degrees F and the addition of moisture using sauce or broth
– Reheating on the stovetop is also suggested, with the pulled pork placed in a saucepan over low heat with water or broth
– Pulled pork stored in the refrigerator can stay good for 3 to 4 days if properly sealed
– Pulled pork can last up to 3 months in the freezer when stored in an airtight container or vacuum-sealed bag
– Reheated pulled pork should reach an internal temperature of 165°F before consuming
– Reheating pulled pork multiple times can cause it to dry out and increase the risk of bacterial growth
– Leftover pulled pork can be used in various ways, such as topping a baked potato, filling for enchiladas, or integrating it into a stir-fry
– To reheat pulled pork without drying it out, add liquid (broth, apple juice, or BBQ sauce), cover with foil or a lid, and use low and slow heating methods
– Barbecue sauce, apple juice, and apple cider vinegar are recommended as liquids to use when reheating pulled pork
– The article encourages readers to try out different methods and recipes for reheating and using pulled pork
– The article suggests pinning the recipes on Pinterest, tagging #AFoodLoversKitchen on Instagram and Facebook, and uploading photos on Pinterest to share experiences with the recipes

Continue Reading

Can you refreeze chicken safely without compromising taste?

– There are various ways to thaw chicken: in the refrigerator, in the microwave, or in cold water.
– Thawing chicken in the refrigerator is the best option, although it takes one to two days.
– Chicken thawed in the refrigerator can be refrozen as is within two days of thawing.
– If chicken is thawed in the microwave or in cold water, it must be cooked before being refrozen.
– Thawing chicken in the microwave may cause parts of the chicken to warm and cook, making it unsafe to refreeze without fully cooking it.
– Chicken thawed in cold water also needs to be cooked before refreezing, as maintaining a consistently cold temperature is difficult.
– Chicken should be cooked to a minimum internal temperature of 165°F.
– The bottom line is that you can refreeze chicken, but it must be cooked first if thawed in the microwave or in cold water.

Continue Reading

How to Reheat Steak in Air Fryer: Top Tips for Juicy Results!

– Guide on how to reheat steak in an air fryer
– Benefits of using an air fryer for reheating steak
– Using rare or medium rare steak for best results
– Optional use of oil for better results
– Using an olive oil spritz instead of aerosol to protect non-stick coating
– Steps for reheating steak in an air fryer
– Preheating the air fryer to prevent overcooking
– Placing the steak in the air fryer basket without touching
– Reheating at 380°F/190°C for 2-3 minute intervals
– Checking internal temperature of the steak
– Flipping the steak over after each interval
– Reheating until reaching at least 110°F/43°C in the center
– Serving with garlic butter or steak sauce
– Not recommended to reheat steak more than once
– Storage of leftovers in airtight container in refrigerator for up to 2 days, for cold consumption or use in salad or sandwich.

Continue Reading

Onion Powder vs Onion: Unveiling the Flavorful Differences

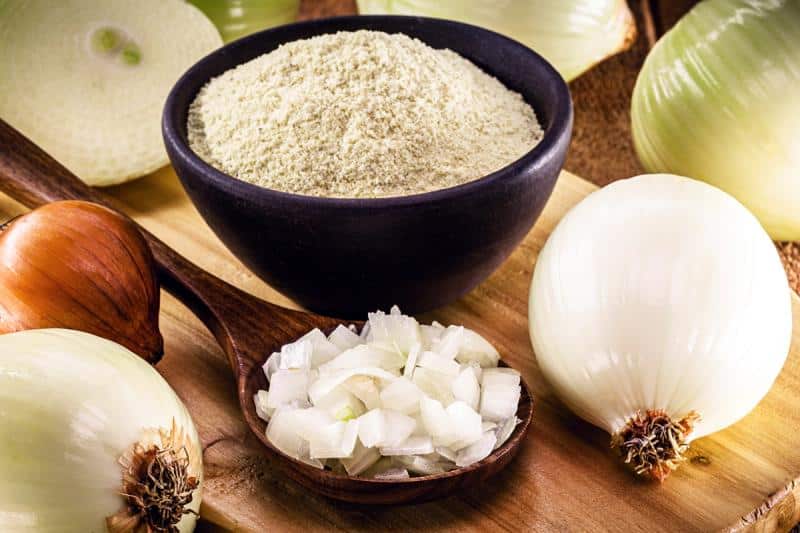
– Onion powder is made from dehydrated onions that are ground into a powder.
– Onion powder can be made from white, yellow, or red onions, and can include the bulb, stems, roots, or skins.
– Onion powder is different from onion salt, and they cannot be used interchangeably.
– Onion powder can be found in seasoned salt or spice mixes, and it can be bought in supermarkets or made at home.
– To make homemade onion powder, you need a food dehydrator (or oven), blender (or food processor), clean jars, and onions.
– The process involves cutting and peeling the onions, slicing them thinly, dehydrating them at high temperature, and grinding them into a powder.
– Onion powder is made from ground dehydrated fresh onion and still retains the aroma of fresh onions.
– It can be used to enhance the onion flavor in savory dishes such as soups, stews, pizzas, pasta, sauces, and dippings.
– Onion powder can also be used to season or dry rub meats, providing a fuller onion flavor.
– In terms of texture, fresh onions are bulky and coarse, while onion powder is smooth and powdered.
– When added to dishes, fresh onions maintain their texture, while onion powder blends well and does not affect the smoothness of sauces or dippings.
– Onion powder is a cost-effective solution for those on a budget.
– Fresh onions have a higher water content (89%) compared to onion powder and can add moisture to dishes.
– Onion powder, being dried and fine, can quickly burn if used in fried dishes.
– Fresh onions have a coarse and fibrous texture after cooking, while onion powder blends completely into dishes.
– The pungent flavor of raw onions can cause tears, while onion powder has a more concentrated flavor and a touch of sweetness.
– Both fresh onions and onion powder are versatile in various recipes, but fresh onions can be eaten raw or used to make pickles, while onion powder is better for dry rubs and increasing oniony flavor.
– The shelf life of fresh onions is shorter due to their high water content, while onion powder has a longer shelf life due to the dehydration process removing all water content and reducing bacteria growth.
– Onion powder can be safe for up to 4 years when stored in sealed jars away from heat and sunlight.
– The controlling level of flavor is easier with fresh onions as you can choose the specific type, whereas store-bought onion powder may not specify the type of onions used.
– Homemade onion powder allows for more control over flavor.
– In terms of nutrition, 100 grams of onion powder has higher levels of nutrients compared to fresh onions, including calories, carbohydrates, potassium, and sodium.
– Both fresh onions and onion powder have health benefits such as improving blood sugar, enhancing bone health, boosting the digestive system, reducing the risk of cancer, and improving heart health.
– Onion powder is easier to digest for some people and can help fight bacteria, such as Helicobacter pylori, which may cause stomach cancer.
– Onion powder is a suitable substitute for fresh onions in cooking when only the flavor of onions is required.

Continue Reading

Can You Freeze Basil? Best Methods and Tips

– The article explains how to freeze basil leaves for long-term preservation.
– Dried basil loses flavor quickly, so freezing is recommended.
– The author suggests cleaning the basil leaves before freezing them.
– There are two options for freezing: freezing whole leaves or freezing sliced basil in olive oil.
– Freezing whole basil leaves involves laying them in a single layer on a baking sheet and placing it in the freezer.
– Freezing basil in oil is another option.
– Both methods allow for easy use of frozen basil in various recipes.
– The article provides a method for freezing basil.
– The process involves thinly slicing the basil leaves, placing them in a silicone mold (such as an ice cube tray), drizzling olive oil over the basil, and freezing the mixture.
– Once frozen, the basil cubes can be removed from the mold, stored in an airtight freezer bag, and kept in the freezer until ready to use in sauces or soups.
– Freezing basil allows for year-round enjoyment of the herb.
– To freeze basil leaves, start by cleaning them and drying them thoroughly.
– You can freeze the leaves whole or sliced in olive oil.
– If you choose to freeze them whole, lay them in a single layer on a baking sheet and slide them into the freezer.
– After about 30 minutes, when the leaves are frozen, transfer them to an airtight bag and return them to the freezer.
– Freezing them in a single layer will prevent them from sticking together.
– Another option is to freeze the basil leaves in oil.
– This article describes a method for freezing basil.
– The process involves thinly slicing the basil leaves and then dividing them into a silicone mold, such as an ice cube tray.
– A little olive oil is drizzled over each batch of basil, and the leaves are pushed down into the oil to ensure each leaf is coated.
– The basil and oil are then placed in the freezer until the oil has hardened.
– Once hardened, the cubes of basil and oil can be popped out of the mold and stored in an airtight freezer bag.
– These frozen basil cubes can be added to sauces or soups.

Continue Reading

Why Is My Chicken Rubbery? Explained & Solved

– Rubberiness in chicken is usually caused by overcooking, undercooking, or poor quality chicken.
– Undercooked chicken has a shiny appearance and jiggly consistency, and is unsafe to eat.
– Poor quality chicken, such as chicken with white striping or woody breasts, can result in rubbery texture regardless of cooking process.
– A 2019 study found a correlation between woody breasts and chicken’s body weight.
– Use a meat thermometer to ensure chicken is cooked to a safe internal temperature of 165°F.
– To fix rubbery chicken, add more liquid and moisture.
– Slow-growing and organic chicken are ideal for preventing rubbery chicken.
– Adding more liquid and fat can help fix rubbery chicken.
– Slow cooking, braising, stewing, steaming, and simmering can prevent rubbery chicken.
– Marinating or brining the chicken before dry heat cooking methods can help keep it tender.
– Reheating chicken at low temperatures and adding moisture can prevent rubbery texture.
– Instant Pot Chicken Noodle Soup, Creamy Chicken Tortilla Soup, Crispy Cilantro Lime Chicken, Instant Pot Greek Chicken and Rice, One Pot Hawaiian Chicken, slow cooker Mexican chicken casserole, Crock Pot salsa chicken, slow cooker chicken tortilla soup, Crock Pot white chicken chili, Instant Pot chicken enchiladas, Instant Pot chicken tinga, and Instant Pot Greek lemon chicken soup are recipes that feature juicy chicken.

Continue Reading

How to thicken tomato sauce: simple tips and tricks

Methods to Thicken Tomato Sauce:

1. Letting the sauce reduce by simmering for a long time.
2. Adding starch:
– Making a cornstarch slurry by mixing equal parts cold water and cornstarch.
– Substituting arrowroot powder for cornstarch.
– Adding mashed potatoes or instant potato flakes.
– Making a roux with butter and flour.
– Using breadcrumbs to soak up water.
3. Adding shredded Parmesan cheese.
4. Adding cheese early in the cooking process.
5. Adding tomato paste.
6. Mixing an egg yolk with a cup of tomato sauce and adding it back to the pan.
7. Adding mashed vegetables like cauliflower, carrots, and onions.
8. Combining a thicker tomato sauce with the homemade sauce.
9. Adding cream cheese.
10. Using clear gel to thicken homemade sauce.
11. Adding leftover pasta water.
12. Adding meat to the sauce.
– Ground beef, Italian sausage, pork sausage, or stew meat.
13. Using ground almonds to thicken tomato sauce.
– Almond flour is effective for gluten-free options.
14. Adding lemon juice to thicken the sauce.
– Half a lemon is sufficient for a large pan of sauce.

Continue Reading

How to Heat Up Honey Baked Ham: Quick and Delicious Methods for Perfection

– Honey-baked ham is a popular main course for holidays and special events.
– Leftover honey-baked ham can be reheated using various methods.
– Reheating methods include warming in the oven, skillet, and microwave.
– These methods help retain the moist flavor of the ham.
– HoneyBaked hams are fully cooked and should be reheated gently in a 325-to-350 degree oven until the internal temperature reaches 135 degrees.
– Reheating can also be done in the microwave.
– Other fully cooked hams should be reheated in a roasting pan with water or a cola/soft drink in the bottom, covered tightly with foil, and heated in a 325-degree oven until it reaches an internal temperature of 135 to 140 degrees.
– Spiral-sliced hams should be placed cut side down in a baking dish.
– For fully cooked hams that are not spiral sliced, remove the skin, score the fat layer, and heat in a 325-to-350 degree oven until heated through and internal temperature reaches 135 degrees.
– Basting with pan juices or glaze is optional.

Continue Reading

How to Cook Boudin: Discover Traditional Recipes

List of methods to cook boudin:

1. Microwave:
– Place boudin on a microwavable plate and cover with a paper towel.
– Heat for 2-3 minutes, turn over, and heat for another minute or two.
– Ensure internal temperature reaches at least 160°F.

2. Oven:
– Preheat oven to 300°F.
– Place boudin on a lightly-oiled cookie sheet.
– Bake for 20 minutes, turning it over every 5 minutes.
– Ensure internal temperature reaches at least 160°F.

3. Steaming:
– Place several links of boudin in a steamer pot with enough water to cover the bottom.
– Heat for 3-5 minutes on the “Cook” cycle and then change to “Warm” setting.
– Boudin is ready in 10-15 minutes.
– Ensure internal temperature reaches at least 160°F.

4. Poaching:
– Season boiling water lightly and bring to a boil.
– Submerge boudin links in boiling water.
– Maintain a light simmer for 10-15 minutes.
– Remove boudin, let it sit for a couple of minutes.
– Ensure internal temperature reaches at least 160°F.

After cooking, let the boudin rest for a minute or two before cutting. Boudin can be served as hors d’oeuvres, in a sandwich, or with eggs for breakfast.

Continue Reading